
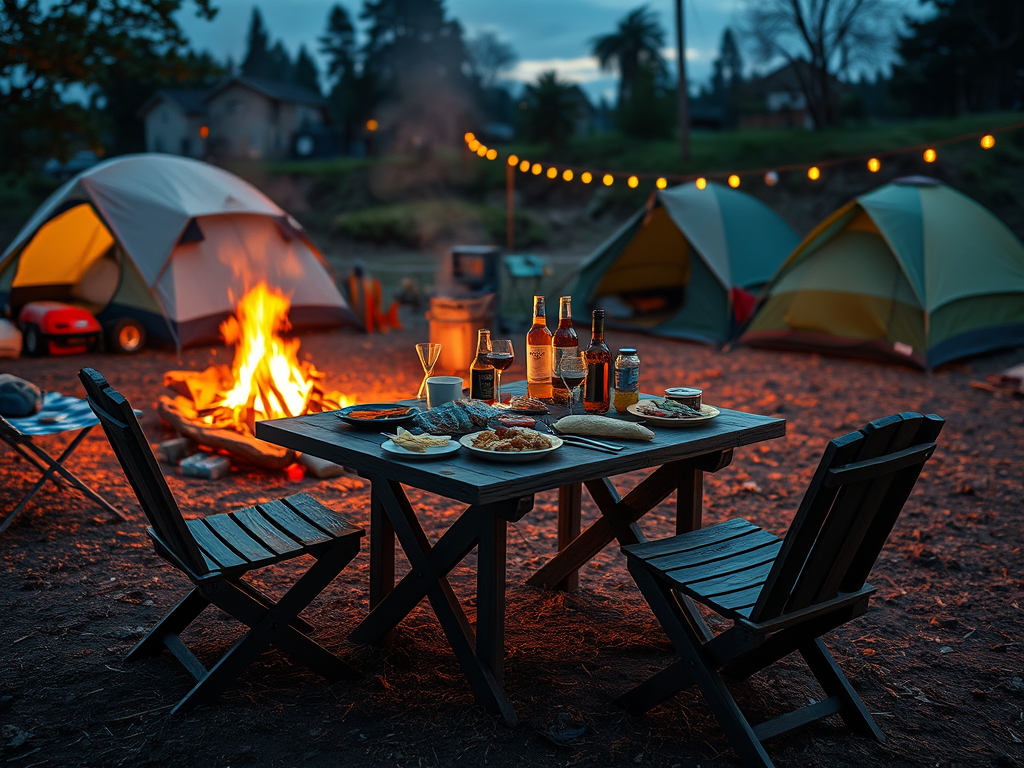
Overlanding is about more than just the journey—it’s about the experience. While many travelers default to freeze-dried or pre-packaged foods for convenience, planning real chef-inspired meals can elevate your trip, nourish your body, and create memorable moments around the campfire. Here’s why you should consider bringing gourmet sensibilities to your next overland adventure, along with daily meal examples, prep times, and required tools.
The Benefits of Restaurant-Quality Meals on the Trail
Enhanced Nutrition and Satisfaction
Superior Ingredient Quality
Chef-inspired meals prioritize the use of fresh, whole ingredients—think crisp vegetables, lean proteins, aromatic herbs, and quality oils. Unlike many pre-packaged or freeze-dried options, these ingredients retain more of their natural nutrients, flavors, and textures. For example, using fresh spinach or bell peppers in a camp stir-fry delivers more vitamins and antioxidants than dehydrated alternatives, supporting immune function and overall health during your trip.
Balanced Macronutrients for Sustained Energy
A chef’s approach to meal planning naturally emphasizes balance:
- Carbohydrates (from grains, root vegetables, or pasta) provide quick energy for hiking or setting up camp.
- Proteins (from meats, eggs, beans, or tofu) support muscle repair and keep you feeling full longer.
- Healthy fats (from olive oil, nuts, or avocado) offer calorie-dense fuel for endurance and help your body absorb fat-soluble vitamins.
This macronutrient balance is crucial for overland travelers, who often burn thousands of calories daily. Chef-inspired meals are designed to be both satisfying and sustaining, preventing the energy crashes that can come from relying solely on sugary snacks or carb-heavy processed foods.
Micronutrient Diversity
Artisan recipes often incorporate a variety of colorful vegetables, herbs, and spices. This diversity ensures you’re getting a broad spectrum of micronutrients—vitamins and minerals essential for energy metabolism, bone health, and immune defense. For instance, a camp-cooked shakshuka with tomatoes, peppers, and eggs delivers vitamin C, potassium, and iron, nutrients that are often lacking in standard trail fare.
Flavor and Psychological Satisfaction
Taste matters, especially after a long, challenging day. Satisfying meals are crafted for flavor as well as nutrition, using techniques like marinating, seasoning, and layering textures. Enjoying a thoughtfully prepared meal can lift spirits, reduce feelings of deprivation, and make the camp experience more enjoyable. The anticipation and enjoyment of a delicious dinner can become a daily highlight, boosting morale and motivation.
Recovery and Well-Being
Proper nutrition is directly linked to how well your body recovers from exertion. Meals rich in antioxidants (from fresh vegetables and herbs), lean proteins, and healthy fats help reduce inflammation, repair muscle tissue, and replenish glycogen stores. This means you’ll wake up feeling stronger and more ready for the next day’s adventure.
Avoiding the Pitfalls of Processed Trail Foods
Many standard trail foods are high in sodium, preservatives, and simple sugars, which can lead to dehydration, digestive discomfort, and energy spikes followed by crashes. Chef-inspired meals, by contrast, allow you to control salt, sugar, and additive levels, supporting better hydration and gut health.
Gourmet meals on the trail aren’t just about luxury—they’re about fueling your body with the nutrients it needs, enhancing your enjoyment of the journey, and supporting your physical and mental well-being every step of the way.
Boosted Morale and Group Camaraderie
The Power of Shared Meals
On an overland trip, the simple act of gathering around a meal takes on heightened significance. After a day of navigating trails, setting up camp, and facing the elements, sharing a thoughtfully prepared meal becomes a ritual that brings people together. The process of cooking and eating as a group fosters a sense of community and belonging, transforming a collection of individuals into a cohesive team.
Cooking as a Collaborative Activity
Elevated meals often require a bit more preparation and teamwork than basic trail fare. This collaboration—chopping vegetables, tending the fire, seasoning dishes—encourages communication and cooperation. Each person can contribute according to their skills or interests, whether it’s prepping ingredients, managing the heat, or plating the final dish. These shared tasks break down barriers, create opportunities for laughter, and give everyone a sense of ownership in the meal.
Meals as Daily Highlights
When the day’s challenges are behind you, sitting down to a delicious, chef-inspired meal can be a true highlight. The anticipation of a special dish—perhaps a campfire-grilled steak, a bubbling pot of curry, or a skillet of fresh-baked cornbread—gives everyone something to look forward to. This sense of reward can lift spirits, especially when the weather is tough or the terrain has been demanding.
Creating Lasting Memories
Food is deeply tied to memory and emotion. The aroma of garlic sizzling in a pan, the warmth of a shared stew, or the novelty of preparing a gourmet meal in the wild can become lasting memories that define the trip. These moments often spark stories, jokes, and traditions that carry forward into future adventures.
Supporting Mental Well-Being
Morale is as important as physical stamina on extended trips. Enjoying good food together helps reduce stress, combats feelings of isolation, and provides comfort in unfamiliar surroundings. The act of sitting together, sharing stories, and savoring a meal can be grounding and restorative, helping everyone recharge for the next day.
Inclusivity and Celebration
Elevated meals can also be tailored to celebrate milestones—like reaching a summit or completing a tough section—or to accommodate dietary preferences, making everyone feel included and valued. Special touches, such as a surprise dessert or a favorite dish, show care and consideration, further strengthening group bonds.
In essence, gourmet meals do more than nourish the body—they nourish the spirit of the group. By turning mealtime into a shared, celebratory experience, you boost morale, deepen connections, and create the kind of camaraderie that makes overlanding truly memorable.
Culinary Creativity and Adventure
Extending the Spirit of Exploration
Overlanding is inherently about venturing into the unknown—discovering new landscapes, testing your limits, and embracing the unexpected. This spirit of adventure doesn’t have to stop at the trail’s edge. By bringing chef-inspired creativity to your camp kitchen, you transform mealtime from a routine necessity into another dimension of exploration. Each meal becomes an opportunity to try something new, to surprise yourself and your companions, and to make the journey even more memorable.
Experimenting with Flavors and Ingredients
Artisanal cooking encourages you to move beyond the basics. Instead of relying solely on bland, pre-packaged foods, you can experiment with spices, herbs, and fresh or preserved ingredients. Imagine infusing a simple campfire stew with smoked paprika and cumin, or brightening a pasta dish with lemon zest and fresh basil. Even in the backcountry, small additions like a squeeze of citrus, a sprinkle of toasted seeds, or a drizzle of olive oil can elevate a meal from ordinary to extraordinary.
Adapting Techniques to the Wild
Cooking in the wild presents unique challenges and opportunities. Crafted meals invite you to adapt classic techniques—like grilling, steaming, or baking—to your camp setup. You might try baking bread in a Dutch oven over coals, grilling marinated vegetables on a portable grate, or crafting foil-packet meals that steam in their own juices. These techniques not only produce delicious results but also add a sense of accomplishment and fun to the process.
Embracing Local and Seasonal Foods
Part of culinary adventure is making use of what’s available. Overlanding often takes you through regions with unique local produce, markets, or even foraging opportunities. Incorporating wild herbs, fresh-caught fish, or locally sourced cheeses into your meals connects you more deeply to the places you’re exploring. It’s a way to celebrate the journey and the land itself.
Fostering Creativity and Problem-Solving
Limited tools and ingredients can actually spark creativity. Artisanal cooking on the trail is about improvisation—substituting ingredients, inventing new combinations, and making the most of what you have. This problem-solving mindset mirrors the adaptability required for successful overlanding, turning obstacles into opportunities for delicious innovation.
Making Meals a Shared Adventure
Inviting your group to participate in meal planning and preparation can turn cooking into a collaborative adventure. Assigning roles, brainstorming recipes, or holding a “camp cook-off” can be as entertaining as any hike or drive. These shared culinary experiences become stories in themselves, adding richness to the overall journey.
Embracing culinary creativity on an overlanding trip transforms meals into an extension of your adventure. By experimenting with flavors, techniques, and local ingredients, you make every meal a celebration of exploration—fueling not just your body, but your curiosity and joy for the journey.
Day 1: Campfire Lemon-Herb Grilled Chicken with Couscous Salad
Why This Meal Works on the Trail
This dish is a perfect example of how chef-inspired meals can be both practical and gourmet in an overlanding context. The lemon-herb marinade infuses the chicken with bright, fresh flavors, while grilling over a campfire adds a smoky depth that’s hard to replicate at home. Couscous is an ideal trail grain: it cooks quickly, is lightweight, and pairs beautifully with a variety of fresh or preserved vegetables.
Step-by-Step Preparation
1. Marinate the Chicken (at home or at camp):
- Combine olive oil, lemon juice, minced garlic, chopped fresh herbs (such as parsley, thyme, or rosemary), salt, and pepper in a resealable bag or container.
- Add chicken breasts and let them marinate for at least 30 minutes (or up to 24 hours in a cooler for maximum flavor).
2. Prepare the Couscous Salad:
- Bring water to a boil in a small pot (couscous typically requires a 1:1 water-to-couscous ratio).
- Stir in couscous, cover, and remove from heat. Let it steam for 5 minutes.
- Fluff with a fork and mix in halved cherry tomatoes, diced cucumber, chopped parsley, and crumbled feta cheese.
- Drizzle with olive oil and season with salt and pepper to taste.
3. Grill the Chicken:
- Place the marinated chicken breasts on a preheated grill grate or portable grill over the campfire.
- Grill for 6–8 minutes per side, or until the chicken is cooked through and has nice grill marks.
- Let the chicken rest for a few minutes before slicing.
4. Serve:
- Plate the couscous salad and top with sliced grilled chicken.
- Garnish with extra herbs or a squeeze of lemon if desired.
Estimated Prep and Cook Time
- Marinating: 30 minutes (can be done ahead)
- Couscous Salad: 10 minutes
- Grilling Chicken: 15–20 minutes
Tools Needed
- Grill grate or portable grill (for the chicken)
- Pot with lid (for couscous)
- Knife and cutting board (for vegetables and herbs)
- Tongs or spatula (for grilling)
- Bowl and fork (for mixing salad)
Nutritional and Culinary Benefits
- Balanced Nutrition: Lean protein from chicken, complex carbs from couscous, healthy fats from olive oil, and vitamins from fresh vegetables.
- Flavorful and Satisfying: The marinade and fresh herbs elevate the meal, making it far more enjoyable than standard trail fare.
- Morale Booster: The aroma of grilling chicken and the vibrant colors of the salad create a festive, communal atmosphere at camp.
Tips for Success
- Pre-mix and pack the marinade in a leak-proof container to save time at camp.
- Use quick-cooking couscous and pre-chopped vegetables to streamline preparation.
- If fresh herbs aren’t available, dried herbs can be substituted, though the flavor will be less vibrant.
This meal sets a high standard for the rest of your trip, proving that with a little planning and creativity, you can enjoy chef-quality food even in the wild.
Day 2: One-Pot Thai Coconut Curry with Rice Noodles
Why This Meal Works on the Trail
A one-pot Thai coconut curry is a trail-friendly, chef-inspired meal that delivers big flavor with minimal fuss. It’s warming, comforting, and packed with nutrients from a variety of vegetables. The use of coconut milk and curry paste creates a rich, aromatic broth, while rice noodles provide satisfying carbohydrates. This meal is also highly adaptable—use whatever vegetables you have on hand, and adjust the spice level to your liking.
Step-by-Step Preparation
1. Prep Ingredients:
- Dice onions, mince garlic, and grate or finely chop fresh ginger.
- Slice bell peppers and snap peas (or substitute with other quick-cooking vegetables like carrots, zucchini, or mushrooms).
- If using protein (tofu, chicken, or shrimp), cut into bite-sized pieces.
2. Sauté Aromatics:
- Heat a splash of oil in a large pot over medium heat.
- Add onions, garlic, and ginger. Sauté for 2–3 minutes until fragrant and onions are translucent.
3. Build the Curry Base:
- Stir in Thai curry paste (red, green, or yellow, depending on your preference).
- Cook for 1–2 minutes to release the flavors.
4. Add Coconut Milk and Vegetables:
- Pour in a can of coconut milk and about 1 cup of water or broth.
- Add sliced vegetables and protein (if using).
- Bring to a gentle simmer and cook for 8–10 minutes, until vegetables are tender and protein is cooked through.
5. Add Rice Noodles:
- If using pre-cooked or quick-cooking rice noodles, add them directly to the pot and stir to combine.
- Simmer for another 2–3 minutes until noodles are heated through and have absorbed some of the curry flavor.
6. Finish and Serve:
- Squeeze in fresh lime juice and sprinkle with chopped cilantro.
- Taste and adjust seasoning with salt, pepper, or a dash of fish sauce or soy sauce if desired.
Estimated Prep and Cook Time
- Ingredient Prep: 10 minutes
- Cooking: 15 minutes
- Total: 25 minutes
Tools Needed
- Large pot (for sautéing and simmering)
- Stirring spoon
- Knife and cutting board
Nutritional and Culinary Benefits
- Balanced Nutrition:
- Healthy fats from coconut milk
- Carbohydrates from rice noodles
- Vitamins, minerals, and fiber from a variety of vegetables
- Optional protein for muscle repair and satiety
- Flavorful and Satisfying:
- The curry paste and coconut milk create a complex, aromatic broth
- Fresh lime and cilantro add brightness and freshness
- Morale Booster:
- The vibrant colors and enticing aroma of the curry can lift spirits and make camp feel like a gourmet restaurant
- Sharing a steaming pot of curry encourages group interaction and comfort
Tips for Success
- Use shelf-stable coconut milk and curry paste packets for easy packing.
- Pre-cooked or instant rice noodles save time and fuel.
- Pack vegetables that travel well (bell peppers, snap peas, carrots) or use dehydrated/freeze-dried options if weight is a concern.
- Adjust the spice level by varying the amount of curry paste.
- For extra protein, add canned chickpeas, tofu, or pre-cooked chicken.
This one-pot Thai coconut curry is a perfect example of how chef-inspired meals can be both practical and exciting on the trail, offering nourishment, comfort, and a taste of culinary adventure.
Day 3: Japanese-Inspired Salmon Teriyaki with Rice and Quick-Pickled Vegetables
- Prep Time: 30 minutes
- Tools Needed: Skillet or small grill, pot for rice, knife, cutting board, small bowl for pickling
Description: This Japanese-inspired meal brings together the rich, savory-sweet flavors of teriyaki-glazed salmon with fluffy rice and crisp, tangy pickled vegetables. It’s a balanced, chef-inspired dish that feels special yet is practical for the trail.
Step-by-Step Preparation
1. Prepare the Quick-Pickled Vegetables:
- Thinly slice cucumbers, carrots, and radishes (or any crunchy vegetables you have).
- In a small bowl, mix rice vinegar, a pinch of sugar, and a pinch of salt.
- Toss the vegetables in the mixture and let them marinate while you prepare the rest of the meal (10–20 minutes).
2. Cook the Rice:
- In a pot, bring water to a boil (use instant or pre-cooked rice for convenience).
- Add rice, cover, and cook according to package instructions. Fluff with a fork when done.
3. Prepare the Salmon:
- If using fresh or vacuum-sealed salmon fillets, season lightly with salt and pepper.
- In a skillet or on a small grill, cook the salmon skin-side down until nearly cooked through (about 3–4 minutes per side).
- Brush with teriyaki sauce (store-bought or a mix of soy sauce, mirin, and a touch of sugar) and cook for another minute until glazed and caramelized.
4. Assemble and Serve:
- Serve the teriyaki salmon over a bed of rice.
- Top with quick-pickled vegetables.
- Garnish with sliced green onions, toasted sesame seeds, or a sprinkle of nori (seaweed) if available.
Nutritional and Culinary Benefits
- Balanced Nutrition:
- Omega-3-rich salmon for healthy fats and protein
- Rice for carbohydrates
- Pickled vegetables for vitamins, minerals, and digestive support
- Flavorful and Satisfying:
- The sweet-savory teriyaki glaze and tangy pickles create a harmonious, refreshing meal
- The combination of textures and flavors keeps the dish interesting and satisfying
- Morale Booster:
- The vibrant presentation and familiar Japanese flavors offer comfort and a sense of luxury on the trail
Tips for Success
- Use shelf-stable, vacuum-packed salmon or canned tuna if fresh fish isn’t practical.
- Pre-mix teriyaki sauce at home and pack in a small bottle.
- Instant rice or pre-cooked rice pouches save time and fuel.
- Pickled vegetables can be made ahead and packed in a small container for the first couple of days.
This Japanese-inspired salmon teriyaki meal is a delicious way to bring global flavors and creativity to your overland adventure.
Day 4: Shakshuka (Eggs Poached in Spiced Tomato Sauce)
Why This Meal Works on the Trail
Shakshuka is a North African and Middle Eastern classic that’s become a global comfort food. It’s ideal for overlanding because it’s hearty, deeply flavorful, and relies on shelf-stable ingredients like canned tomatoes and spices, with eggs as the protein source. It’s also a one-pan meal, minimizing cleanup and maximizing convenience. The vibrant colors and aromas make it feel like a true campfire feast.
Step-by-Step Preparation
1. Prep the Vegetables:
- Dice onions and bell peppers (red or green work well).
- Mince a few cloves of garlic.
2. Sauté the Base:
- Heat a splash of olive oil in a skillet or Dutch oven over medium heat.
- Add onions and peppers, sautéing until softened and slightly caramelized (about 5–7 minutes).
- Add garlic and cook for another minute until fragrant.
3. Build the Sauce:
- Stir in ground cumin, smoked paprika, and chili powder (adjust the amount for your preferred spice level).
- Pour in a can of diced tomatoes (with juices).
- Season with salt and pepper.
- Simmer for 5–10 minutes, stirring occasionally, until the sauce thickens and flavors meld.
4. Poach the Eggs:
- Make small wells in the sauce with a spoon.
- Crack eggs directly into the wells.
- Cover the skillet or Dutch oven with a lid or foil.
- Simmer gently for 5–8 minutes, until the egg whites are set but yolks are still runny (or longer for firmer yolks).
5. Serve:
- Spoon the shakshuka into bowls or serve directly from the pan.
- Enjoy with slices of crusty bread, pita, or flatbread to scoop up the sauce and eggs.
Estimated Prep and Cook Time
- Vegetable Prep: 5 minutes
- Cooking: 15 minutes
- Total: 20 minutes
Tools Needed
- Skillet or Dutch oven (with lid or foil)
- Stirring spoon
- Knife and cutting board
Nutritional and Culinary Benefits
- Balanced Nutrition:
- Eggs provide high-quality protein and healthy fats
- Tomatoes and peppers offer vitamins A and C, potassium, and antioxidants
- Olive oil adds heart-healthy fats
- Flavorful and Satisfying:
- The combination of sweet peppers, tangy tomatoes, and warming spices creates a deeply satisfying, aromatic dish
- The runny yolks enrich the sauce, making every bite luxurious
- Morale Booster:
- The vibrant colors and enticing aroma are uplifting after a long day
- Sharing a bubbling pan of shakshuka around the campfire feels communal and celebratory
Tips for Success
- Use canned tomatoes and jarred roasted peppers for convenience and to save on prep time.
- Crack eggs into a cup first to avoid shells in the pan.
- If you like, add extras like crumbled feta, chopped parsley, or a pinch of cayenne for more flavor.
- For a heartier meal, add canned chickpeas or serve with a side salad.
Shakshuka is a perfect example of a chef-inspired, one-pan meal that’s easy to prepare on the trail, packed with nutrition, and guaranteed to bring warmth and comfort to your overlanding adventure.
Day 5: Chinese-Inspired Braised Pork Belly with Rice and Stir-Fried Greens
- Prep Time: 40 minutes (active prep: 15 minutes, simmering: 25 minutes)
- Tools Needed: Deep skillet or small Dutch oven, pot for rice, knife, cutting board, stirring spoon
Description: This Chinese-inspired meal features tender pork belly braised in a savory-sweet soy sauce with aromatics, served over fluffy rice and accompanied by quick stir-fried greens. It’s a comforting, flavor-packed dish that brings the essence of Chinese home cooking to the trail.
Step-by-Step Preparation
1. Prep the Pork Belly and Aromatics:
- Cut pork belly into bite-sized cubes.
- Slice ginger and garlic; chop green onions (reserve some for garnish).
2. Sear the Pork Belly:
- Heat a deep skillet or Dutch oven over medium-high heat.
- Add pork belly pieces and sear until browned on all sides, rendering some fat (about 5–7 minutes).
- Remove excess fat if desired, leaving enough to sauté aromatics.
3. Build the Braising Sauce:
- Add sliced ginger, garlic, and the white parts of green onions to the pan. Sauté until fragrant.
- Stir in 2–3 tablespoons of soy sauce, 1 tablespoon of dark soy sauce (if available), 1 tablespoon of sugar or honey, and a splash of rice wine or sherry (optional).
- Add enough water to just cover the pork. Bring to a simmer.
4. Braise the Pork Belly:
- Cover and simmer gently for 20–25 minutes, stirring occasionally, until the pork is tender and the sauce is glossy and slightly thickened.
5. Cook the Rice:
- While the pork is braising, cook rice in a separate pot according to package instructions (instant or pre-cooked rice is ideal for the trail).
6. Stir-Fry the Greens:
- In the last 5 minutes of braising, heat a little oil in another pan (or use the same pan after removing the pork).
- Add chopped bok choy, spinach, or other greens. Stir-fry with a splash of soy sauce and a pinch of garlic until just wilted.
7. Serve:
- Spoon rice into bowls, top with braised pork belly and sauce.
- Add a side of stir-fried greens.
- Garnish with reserved green onions and, if available, a sprinkle of toasted sesame seeds.
Nutritional and Culinary Benefits
- Balanced Nutrition:
- Pork belly provides protein and energy-dense fats
- Rice offers carbohydrates for sustained energy
- Greens add vitamins, minerals, and fiber
- Flavorful and Satisfying:
- The braising sauce is rich, savory, and slightly sweet, with deep umami from soy and aromatics
- The contrast of tender pork, fluffy rice, and crisp greens creates a satisfying meal
- Morale Booster:
- The aroma of braising pork and soy sauce is deeply comforting and reminiscent of home-cooked Chinese meals
- Sharing a hearty, flavorful dish like this can be a highlight of the trip
Tips for Success
- Use pre-cooked or shelf-stable pork belly (available in some Asian markets) if fresh isn’t practical.
- Pre-mix the braising sauce at home and pack in a small bottle for convenience.
- Substitute with canned greens or dehydrated vegetables if fresh greens aren’t available.
- For extra flavor, add a star anise or a pinch of five-spice powder to the braise.
This Chinese-inspired braised pork belly dish brings warmth, comfort, and a touch of culinary adventure to your overlanding experience, proving that even on the trail, you can enjoy the depth and richness of global cuisine.
Day 6: Campfire Steak with Chimichurri and Roasted Vegetables
Why This Meal Works on the Trail
A perfectly grilled steak with vibrant chimichurri and smoky roasted vegetables is a celebration of both simplicity and flavor. This meal is ideal for overlanding because it uses minimal, fresh ingredients, requires only basic tools, and delivers a restaurant-quality experience in the wild. The process of grilling over an open fire and assembling a fresh herb sauce brings a sense of ritual and reward after a long day outdoors.
Step-by-Step Preparation
1. Prepare the Chimichurri Sauce:
- Finely chop a large handful of fresh parsley and a few cloves of garlic.
- In a bowl, combine parsley, garlic, a splash of red wine vinegar (or lemon juice), a generous pour of olive oil, salt, pepper, and a pinch of red pepper flakes.
- Stir well and let the flavors meld while you prepare the rest of the meal. Chimichurri can be made ahead and packed in a small jar for convenience.
2. Prep the Vegetables:
- Slice zucchini, bell peppers, and onions into bite-sized pieces.
- Toss the vegetables with olive oil, salt, pepper, and any dried herbs you like (thyme, oregano, or rosemary work well).
- Place the vegetables on a large sheet of heavy-duty foil. Fold and seal the foil to create a packet, ensuring it’s tightly closed to trap steam.
3. Grill the Steak:
- Season steaks (such as sirloin, ribeye, or flank) generously with salt and pepper.
- Place the steaks on a preheated grill grate or in a hot skillet over the campfire.
- Grill for 3–5 minutes per side for medium-rare, adjusting time based on thickness and desired doneness.
- Let the steaks rest for a few minutes after grilling to retain juices.
4. Roast the Vegetables:
- Place the foil packet of vegetables on the edge of the campfire or on the grill.
- Roast for 15–20 minutes, turning occasionally, until the vegetables are tender and slightly caramelized.
5. Serve:
- Slice the steak and arrange on plates or camp bowls.
- Spoon chimichurri generously over the steak.
- Serve with a side of roasted vegetables, straight from the foil packet for rustic appeal.
Estimated Prep and Cook Time
- Chimichurri Prep: 10 minutes
- Vegetable Prep: 10 minutes
- Grilling and Roasting: 15–20 minutes
- Total: 35 minutes
Tools Needed
- Grill grate or heavy skillet (for steak)
- Bowl and spoon (for chimichurri)
- Knife and cutting board (for herbs, vegetables, and steak)
- Heavy-duty foil (for roasting vegetables)
- Tongs or spatula (for handling steak and foil packets)
Nutritional and Culinary Benefits
- Balanced Nutrition:
- Steak provides high-quality protein and iron
- Olive oil and chimichurri offer healthy fats and antioxidants
- Roasted vegetables supply fiber, vitamins, and minerals
- Flavorful and Satisfying:
- The steak’s smoky char pairs perfectly with the bright, garlicky chimichurri
- Roasted vegetables add sweetness and depth, rounding out the meal
- Morale Booster:
- The act of grilling and sharing steak around the fire is festive and communal
- The fresh, zesty chimichurri and colorful vegetables elevate the meal, making it feel like a special occasion
Tips for Success
- Use pre-cut vegetables or pre-mixed chimichurri to save time at camp.
- If fresh herbs aren’t available, substitute with dried parsley and a squeeze of lemon for brightness.
- For easy cleanup, eat directly from the foil packets and use the same bowl for chimichurri and serving.
- Adjust the steak’s doneness to group preference, and let everyone customize their plate with extra sauce or veggies.
This campfire steak dinner is a testament to how gourmet meals can transform a simple night on the trail into a memorable culinary event, blending the primal joy of fire-cooked food with the freshness and flair of a homemade sauce.
Day 7: Smoky Campfire Chili with Cornbread
Why This Meal Works on the Trail
A hearty chili paired with freshly baked cornbread is the ultimate comfort food for the final night of an overland adventure. This meal is deeply satisfying, warming, and packed with protein, fiber, and flavor. The smoky notes from the campfire and smoked paprika evoke a sense of rustic tradition, while the cornbread adds a touch of home-baked goodness that’s both nourishing and morale-boosting. It’s a communal dish, perfect for sharing and reflecting on the journey.
Step-by-Step Preparation
1. Brown the Meat and Aromatics:
- Heat a Dutch oven or large pot over the campfire or a camp stove.
- Add ground beef or turkey and cook, breaking it up with a spoon, until browned.
- Add chopped onions and minced garlic, sautéing until softened and fragrant (about 5–7 minutes).
2. Build the Chili:
- Stir in chili powder, smoked paprika, cumin, and a pinch of cayenne for heat.
- Add canned diced tomatoes (with juices) and drained beans (kidney, black, or pinto beans work well).
- Season with salt, pepper, and a splash of hot sauce if desired.
- Pour in a little water or broth to reach your preferred chili consistency.
3. Simmer:
- Cover and simmer the chili for 20–30 minutes, stirring occasionally.
- Let the flavors meld and the sauce thicken. The longer it simmers, the deeper the flavor.
4. Prepare the Cornbread Batter:
- In a mixing bowl, combine cornmeal, flour, baking powder, a pinch of salt, and a bit of sugar.
- Add powdered eggs (or a fresh egg if you have one), powdered milk (or regular milk), and a splash of oil or melted butter.
- Stir until just combined; the batter should be thick but pourable.
5. Bake the Cornbread:
- Grease the bottom of a clean Dutch oven or use parchment paper.
- Pour the cornbread batter on top of the simmering chili (for a one-pot “chili pie”) or in a separate, preheated Dutch oven.
- Cover with the lid and place hot coals on top to create an oven effect.
- Bake for 15–20 minutes, checking occasionally, until the cornbread is golden and cooked through.
6. Serve:
- Spoon generous portions of chili into bowls.
- Cut the cornbread into wedges and serve alongside or on top of the chili.
- Garnish with chopped green onions, shredded cheese, or a dollop of sour cream if available.
Estimated Prep and Cook Time
- Chili Prep: 10 minutes
- Chili Simmer: 20–30 minutes
- Cornbread Prep: 5 minutes
- Cornbread Bake: 15–20 minutes
- Total: 40 minutes (can be prepped ahead for faster assembly)
Tools Needed
- Dutch oven or large pot (for chili and baking cornbread)
- Mixing bowl (for cornbread batter)
- Spoon or spatula (for stirring and serving)
- Knife and cutting board (for aromatics and garnishes)
Nutritional and Culinary Benefits
- Balanced Nutrition:
- Protein from meat and beans
- Fiber and complex carbs from beans and cornbread
- Vitamins and minerals from tomatoes, onions, and optional garnishes
- Flavorful and Satisfying:
- The chili is rich, smoky, and deeply spiced, with a satisfying texture from beans and meat
- Cornbread adds a sweet, crumbly contrast that soaks up the chili’s sauce
- Morale Booster:
- The aroma of chili simmering and cornbread baking over the fire is inviting and comforting
- Sharing a big pot of chili and warm bread fosters a sense of celebration and closure to the trip
Tips for Success
- Use pre-mixed chili seasoning and cornbread mix for convenience.
- If baking cornbread on top of the chili, keep the lid tightly closed and check for doneness with a knife or toothpick.
- For a vegetarian version, omit the meat and add extra beans or lentils.
- Leftover chili makes a great filling for wraps or breakfast burritos the next day.
This smoky campfire chili with cornbread is a fitting finale for an overland journey—hearty, flavorful, and deeply satisfying, it brings everyone together for one last memorable meal under the open sky.
Conclusion
Planning real gourmet meals for your overlanding trip transforms eating from a chore into a highlight. With a bit of preparation and the right tools, you can enjoy delicious, nourishing, and memorable meals that fuel both body and spirit—making your adventure truly unforgettable.
Elevating the Overland Experience
When you approach camp cooking with the creativity and care of a chef, meals become more than just fuel—they become an integral part of the adventure. The anticipation of a thoughtfully prepared dinner after a long day on the trail adds excitement and comfort. The aromas of fresh herbs, sizzling meats, and roasting vegetables drifting through camp can lift spirits and create a sense of home, even in the wildest places.
Nourishing Body and Mind
Chef-inspired meals are designed to provide balanced nutrition, supporting the high energy demands of overlanding. By focusing on fresh ingredients, diverse flavors, and proper macronutrient balance, you ensure your body is well-fueled for the physical challenges ahead. At the same time, the pleasure of eating well-crafted food supports mental well-being, helping to stave off fatigue, boredom, and homesickness.
Building Community and Memories
Sharing a special meal around the campfire fosters camaraderie and connection. Cooking together, experimenting with new recipes, and savoring the results as a group creates lasting memories and strengthens bonds. These shared experiences often become the stories you remember most vividly from your journey.
Encouraging Creativity and Adaptability
Chef-inspired cooking on the trail encourages you to be resourceful and inventive. Limited ingredients and tools become opportunities for culinary creativity, turning simple meals into gourmet experiences. This spirit of adaptability mirrors the essence of overlanding itself—embracing challenges, making the most of what you have, and finding joy in the journey.
Practical Rewards
With a little planning—prepping marinades, mixing sauces, or portioning ingredients ahead of time—you can streamline camp cooking without sacrificing quality. Lightweight, multi-use tools and carefully chosen ingredients make it possible to enjoy chef-level meals without overburdening your pack or vehicle.
In the end, investing effort into your overland meals pays off in countless ways. Each dish becomes a celebration of the day’s achievements, a comfort in the face of challenges, and a source of joy that enhances every aspect of your adventure. By making food a highlight rather than an afterthought, you transform your trip into a truly unforgettable experience—one that nourishes, delights, and inspires at every turn.


Leave a Reply