
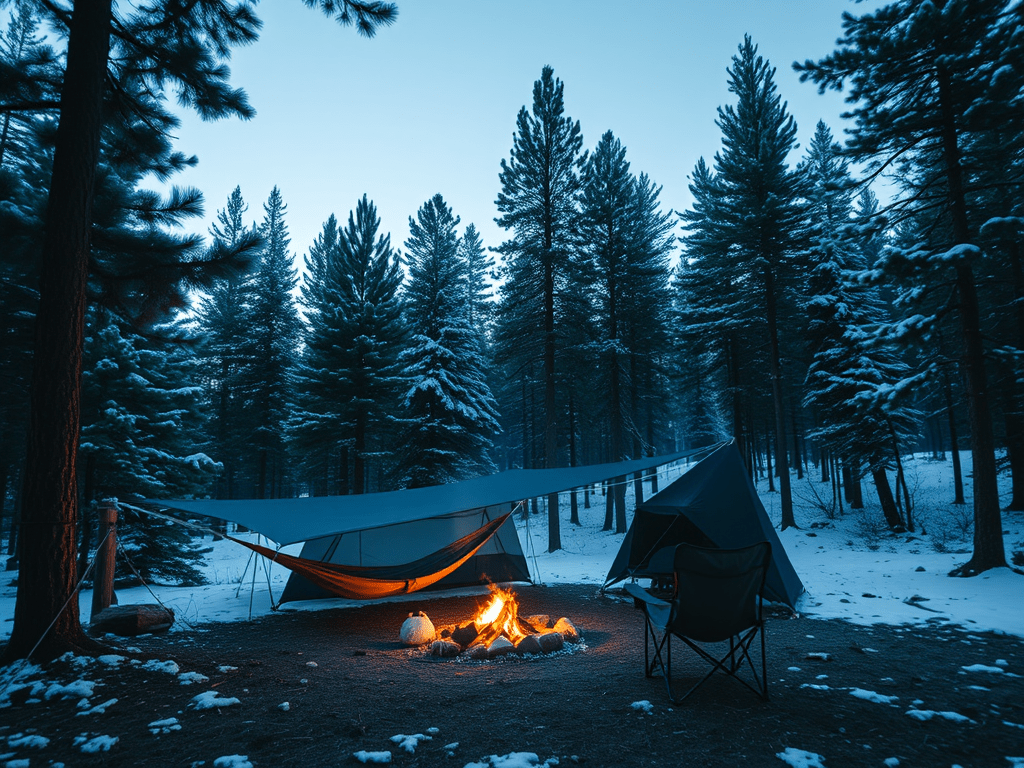
Winter camping can be a thrilling and rewarding experience, offering a unique opportunity to connect with nature in its most serene and pristine state. However, it also presents a set of challenges that require careful planning and preparation. Whether you’re using a tent or a hammock, avoiding common mistakes can make the difference between a memorable adventure and a miserable ordeal. Here are the top ten mistakes people often make when winter camping with tents or hammocks, and how to avoid them.
1. Inadequate Insulation
Inadequate insulation is a common pitfall for winter campers, and it can significantly impact comfort and safety during a cold-weather outing. Proper insulation is crucial because it helps retain body heat and prevents the cold from seeping in, which is especially important when temperatures drop significantly at night.
Insulation in Tent Camping
When camping in a tent during winter, the ground becomes a major source of heat loss. The earth can quickly draw warmth away from your body, leading to a cold and uncomfortable night. To combat this, a high-quality sleeping pad is essential. Here are some key considerations:
- R-Value: The R-value measures a sleeping pad’s ability to resist heat flow. The higher the R-value, the better the insulation. For winter camping, a sleeping pad with an R-value of at least 4.0 to 5.0 is recommended. Some campers even layer two pads for extra insulation.
- Types of Sleeping Pads: There are three main types of sleeping pads: closed-cell foam, self-inflating, and air pads. Closed-cell foam pads are durable and provide consistent insulation, but they can be bulky. Self-inflating pads offer a balance of comfort and insulation, while air pads are lightweight and compact but may require additional insulation for winter use.
- Layering: In extreme cold, consider layering a closed-cell foam pad beneath an inflatable pad. This combination provides excellent insulation and a backup in case the inflatable pad fails.
Insulation in Hammock Camping
Hammock camping in winter presents unique challenges because of the exposure to cold air circulating beneath the hammock. This can lead to what is colloquially known as “cold butt syndrome,” where the underside of the body becomes uncomfortably cold. To prevent this, proper insulation is crucial:
- Underquilts: An underquilt is a quilt that hangs beneath the hammock, providing insulation without compressing under your body weight. It is one of the most effective ways to stay warm in a hammock during winter. Underquilts come in various temperature ratings, so choose one appropriate for the expected conditions.
- Sleeping Pads: While underquilts are generally preferred, a sleeping pad can also be used in a hammock. However, it may shift during the night, so a pad designed specifically for hammocks, which often features a non-slip surface or wings to wrap around the sides, can be beneficial.
- Top Quilts: In addition to underquilts, top quilts are used in place of traditional sleeping bags. They provide insulation from above and are designed to work in tandem with underquilts to create a cocoon of warmth.
- Hammock Socks and Covers: These are additional layers that can be added around the hammock to trap heat and block wind. They can significantly enhance warmth by reducing heat loss due to wind chill.
General Tips for Insulation
- Clothing: Wear insulated clothing to bed, including thermal base layers, wool socks, and a hat. Avoid overdressing, as sweating can lead to moisture buildup and increased heat loss.
- Ventilation: While it might seem counterintuitive, ensuring proper ventilation in your tent or hammock setup can prevent condensation, which can dampen insulation and reduce its effectiveness.
- Hot Water Bottles: Placing a hot water bottle in your sleeping bag or hammock can provide additional warmth throughout the night.
Understanding and addressing the need for adequate insulation is vital for a successful winter camping experience. By investing in the right gear and employing effective strategies, campers can stay warm and comfortable, allowing them to fully enjoy the beauty and tranquility of the winter landscape.
2. Improper Clothing
When it comes to winter camping, choosing the right clothing is crucial for maintaining warmth and preventing hypothermia. The key is to dress in layers, each serving a specific purpose to manage moisture, provide insulation, and protect against the elements.
The Layering System
- Base Layer: The primary function of the base layer is moisture management. It should wick sweat away from your skin to keep you dry, as moisture can lead to rapid heat loss.
- Materials: Avoid cotton, as it absorbs moisture and dries slowly, which can leave you feeling cold and damp. Instead, choose synthetic fabrics like polyester or natural fibers like merino wool. These materials are excellent at wicking moisture and dry quickly.
- Fit: The base layer should fit snugly against your skin to effectively wick moisture away.
- Mid-Layer: This layer provides insulation by trapping body heat. The choice of material depends on the expected weather conditions and your activity level.
- Fleece: Lightweight and breathable, fleece is a popular choice for moderate conditions. It provides good insulation and dries quickly if it gets wet.
- Down: Known for its excellent warmth-to-weight ratio, down is ideal for very cold conditions. However, it loses its insulating properties when wet, so it should be paired with a waterproof outer layer.
- Synthetic Insulation: Materials like PrimaLoft offer insulation similar to down but retain warmth even when wet, making them a versatile option for varying conditions.
- Outer Layer (Shell): The outer layer protects against wind, rain, and snow. It should be both waterproof and windproof while allowing moisture from sweat to escape.
- Hard Shells: Made from materials like Gore-Tex, hard shells offer maximum protection against the elements. They are ideal for harsh weather but can be less breathable.
- Soft Shells: These provide a balance between weather protection and breathability, suitable for milder conditions or high-output activities.
Additional Clothing Considerations
- Accessories: Don’t overlook the importance of hats, gloves, and socks. A significant amount of body heat is lost through the head, so wearing a warm hat is essential. Gloves should be insulated and waterproof, and socks should be made of wool or synthetic materials to keep feet warm and dry.
- Layer Adjustments: Be prepared to adjust your layers based on activity level and weather changes. Remove layers before you start sweating to prevent moisture buildup, and add layers when you stop moving to retain warmth.
- Ventilation: Many outer layers come with ventilation options like pit zips or mesh-lined pockets. Use these features to regulate temperature and moisture without removing layers.
- Footwear: Insulated, waterproof boots are crucial for keeping feet warm and dry. Consider using gaiters to prevent snow from entering your boots.
Avoiding Hypothermia
Hypothermia is a serious risk when winter camping, and improper clothing can exacerbate this danger. Here are some tips to prevent it:
- Stay Dry: Wet clothing accelerates heat loss. Change out of wet clothes as soon as possible and keep a dry set of clothes for sleeping.
- Monitor Weather: Be aware of wind chill, which can make temperatures feel significantly colder and increase the risk of hypothermia.
- Stay Nourished and Hydrated: Eating high-energy foods and staying hydrated helps your body generate heat.
Proper clothing is a cornerstone of safe and enjoyable winter camping. By understanding the function of each layer and choosing the right materials, you can effectively manage moisture, retain warmth, and protect yourself from the elements. This preparation not only enhances comfort but also plays a critical role in preventing hypothermia and ensuring a successful winter camping experience.
3. Neglecting Weather Conditions
Neglecting weather conditions is a critical mistake that can turn a winter camping trip into a hazardous experience. Weather in winter can be unpredictable and severe, with conditions changing rapidly. Proper preparation and awareness are essential to ensure safety and enjoyment.
Importance of Weather Monitoring
- Weather Forecasts: Before embarking on a winter camping trip, it is crucial to check the weather forecast for your destination. Look for information on temperature, precipitation, wind speed, and any severe weather warnings. Use reliable sources such as national meteorological services or trusted weather apps.
- Continuous Monitoring: Weather can change quickly, especially in mountainous or remote areas. If possible, bring a portable weather radio or use a smartphone app to receive updates. Be prepared to adjust your plans if conditions worsen.
- Understanding Local Weather Patterns: Familiarize yourself with the typical weather patterns of the area you plan to visit. Some regions may experience sudden snow squalls, while others might be prone to high winds or rapid temperature drops.
Key Weather Factors to Consider
- Temperature: Knowing the expected temperature range helps you prepare the right clothing and gear. Remember that temperatures can drop significantly at night, and the perceived temperature can be much lower due to wind chill.
- Wind Chill: Wind chill is a critical factor in winter camping. It measures how cold it feels when the wind is factored in with the actual air temperature. High winds can strip away body heat rapidly, increasing the risk of frostbite and hypothermia. Understanding wind chill can help you dress appropriately and choose a sheltered campsite.
- Precipitation: Snow and ice can impact travel plans and campsite conditions. Heavy snowfall can obscure trails and increase avalanche risk, while freezing rain can create hazardous surfaces. Be prepared with appropriate gear, such as snowshoes or crampons, and know how to navigate in snowy conditions.
- Storms: Winter storms can bring a combination of snow, ice, and high winds. These conditions can be dangerous, especially if you are caught in an exposed area. Always have a plan for seeking shelter and know the signs of an approaching storm.
Preparation and Safety Measures
- Gear and Equipment: Ensure your gear is suitable for the worst-case weather scenario. This includes a four-season tent capable of withstanding snow loads and high winds, as well as a sleeping bag rated for the lowest expected temperatures.
- Campsite Selection: Choose a campsite that offers natural protection from the wind, such as behind a stand of trees or a rock formation. Avoid camping in low-lying areas where cold air settles or in avalanche-prone zones.
- Emergency Plan: Have a clear emergency plan in place. This includes knowing the nearest shelter or exit route, carrying a map and compass, and having a means of communication, such as a satellite phone or personal locator beacon.
- Skills and Knowledge: Equip yourself with the skills needed to handle adverse weather conditions. This includes building a snow shelter, starting a fire in wet conditions, and recognizing the signs of hypothermia and frostbite.
- Flexibility: Be willing to change your plans based on the weather. This might mean delaying your trip, choosing a different location, or turning back if conditions become unsafe.
Neglecting weather conditions can lead to dangerous situations in winter camping, but with careful planning and vigilance, these risks can be mitigated. By continuously monitoring the weather, understanding key factors like wind chill and precipitation, and preparing for sudden changes, campers can enhance their safety and enjoyment. Ultimately, respecting the power of nature and being prepared for its unpredictability is essential for a successful winter camping experience.
4. Poor Site Selection
Selecting the right campsite is a crucial aspect of winter camping that can significantly affect your comfort and safety. Poor site selection can expose you to harsh environmental conditions and potential hazards, making your camping experience challenging and even dangerous. Here’s how to choose an optimal campsite during winter camping.
Key Considerations for Site Selection
- Protection from Wind: Wind can rapidly strip away body heat and make cold temperatures feel even colder. To minimize exposure, look for natural windbreaks such as dense stands of trees, large boulders, or hills. These features can provide shelter from prevailing winds, reducing wind chill and making your campsite more comfortable.
- Avoiding Low-Lying Areas: Cold air is denser than warm air and tends to settle in low-lying areas such as valleys or depressions. These areas can be significantly colder than surrounding higher ground. Instead, choose a site on a slight elevation to avoid the cold air pooling and to benefit from better air circulation.
- Steering Clear of Avalanche-Prone Zones: If you are camping in mountainous or hilly terrain, it is vital to be aware of avalanche risks. Avoid camping at the base of steep slopes or in gullies where avalanches are more likely to occur. Familiarize yourself with the terrain and consult avalanche forecasts if available.
- Avoiding Overhead Hazards: Be mindful of potential hazards above your campsite, such as dead or overhanging branches, which can fall under the weight of snow or due to wind. These are often referred to as “widowmakers” and can pose a serious risk. Choose a site with healthy, sturdy trees or in an open area away from potential falling debris.
- Proximity to Water Sources: While it’s convenient to camp near a water source, be cautious of camping too close to rivers or lakes, as these areas can be colder and more humid. Additionally, water levels can rise unexpectedly due to snowmelt or rain, posing a flooding risk.
- Sun Exposure: Consider the sun’s path when selecting your site. A location that receives morning sun can help warm your campsite and melt frost or snow, making for a more pleasant start to the day. However, be mindful of the potential for snow glare, which can be mitigated with sunglasses or a brimmed hat.
Practical Steps for Site Selection
- Scout the Area: Before setting up camp, take the time to walk around and assess the area. Look for signs of wildlife activity, which can indicate a good location, but also be aware of potential wildlife hazards.
- Test the Ground: Ensure the ground is stable and not prone to flooding or excessive snow accumulation. If the snow is deep, pack it down to create a firm base for your tent.
- Consider Accessibility: Ensure your campsite is accessible and that you can easily reach it with your gear. Also, consider how easy it will be to leave the site in case of an emergency or sudden weather change.
- Leave No Trace: Choose a site that minimizes your impact on the environment. Camp on durable surfaces like snow or established campsites, and follow Leave No Trace principles to protect the natural surroundings.
Poor site selection can lead to exposure to harsh weather, increased risk of accidents, and overall discomfort. By carefully considering factors such as wind protection, elevation, avalanche risk, and overhead hazards, you can choose a campsite that enhances your safety and enjoyment. Taking the time to select the right site not only contributes to a successful winter camping experience but also helps preserve the natural environment for future adventurers.
5. Inadequate Shelter Setup
Setting up your shelter correctly is a fundamental aspect of winter camping that directly impacts your comfort and safety. An inadequate shelter setup can lead to exposure to the elements, resulting in a cold and uncomfortable night. Whether you’re using a tent or a hammock, understanding the nuances of proper setup is essential. Here’s a detailed exploration of how to effectively set up your shelter for winter camping.
Tent Setup
- Site Preparation: Before setting up your tent, prepare the site by clearing away snow and debris. If the snow is deep, pack it down to create a firm, level surface. This not only provides a stable base but also helps insulate the tent floor from the cold ground.
- Orientation and Positioning: Position your tent with the entrance facing away from prevailing winds to minimize wind exposure. If possible, use natural features like trees or rocks as additional windbreaks.
- Staking and Guying Out: Securely stake your tent using snow stakes or deadman anchors if the ground is too hard or covered in snow. Guy lines should be taut and properly angled to provide stability against wind. Consider using additional guy lines for extra support in windy conditions.
- Ventilation: Proper ventilation is crucial to prevent condensation buildup inside the tent. Use vents or partially open the rainfly to allow moisture to escape while maintaining warmth. This helps keep your gear dry and reduces the risk of frost forming inside the tent.
- Rainfly and Footprint: Ensure the rainfly is properly attached and extends fully over the tent to provide protection from snow and wind. A footprint or groundsheet beneath the tent adds an extra layer of insulation and protects the tent floor from moisture and abrasion.
Hammock Setup
- Proper Hang Angle: The ideal hang angle for a hammock is around 30 degrees from horizontal. This angle provides the right balance of comfort and support, reducing pressure points and allowing for a flat sleeping position.
- Tree Selection and Straps: Choose sturdy, healthy trees that are about 12 to 15 feet apart. Use tree-friendly straps to avoid damaging the bark. Ensure the straps are securely fastened and can support your weight.
- Tarp Setup: A tarp is essential for protecting against snow, wind, and rain. Set up the tarp with a ridge line above the hammock, ensuring it extends beyond both ends of the hammock for full coverage. Adjust the tarp’s angle based on weather conditions—steeper for rain and snow, flatter for wind protection.
- Insulation: Use an underquilt or sleeping pad to insulate the underside of the hammock, preventing heat loss from cold air circulating beneath you. A top quilt or sleeping bag provides insulation from above.
- Wind Protection: Position the hammock and tarp to minimize wind exposure. Consider using additional windbreaks, such as natural features or a wind sock, to enhance protection.
General Tips for Shelter Setup
- Practice at Home: Before heading out, practice setting up your tent or hammock at home. Familiarity with your gear ensures a quicker and more efficient setup in cold conditions.
- Check for Wear and Tear: Inspect your shelter for any damage or wear before your trip. Repair any tears or broken components to ensure your shelter performs optimally.
- Emergency Shelter: Consider carrying an emergency bivy or space blanket as a backup in case of shelter failure or unexpected conditions.
An inadequate shelter setup can lead to exposure to cold, wind, and moisture, making for an uncomfortable and potentially dangerous camping experience. By taking the time to properly set up your tent or hammock, you can create a warm, secure environment that enhances your safety and comfort. Understanding the principles of site preparation, orientation, and insulation, along with practicing your setup skills, will ensure a successful and enjoyable winter camping adventure.
6. Ignoring Hydration and Nutrition
Ignoring hydration and nutrition is a common mistake that can have serious consequences during winter camping. Cold weather can mask the body’s signals for thirst and hunger, leading campers to underestimate their needs. However, maintaining proper hydration and nutrition is crucial for staying warm, energized, and healthy in cold environments. Here’s a detailed exploration of why these factors are important and how to manage them effectively.
Importance of Hydration
- Dehydration Risks: In cold weather, the body’s thirst response is diminished, and the dry air can lead to increased water loss through respiration. Dehydration can impair physical performance, cognitive function, and the body’s ability to regulate temperature, increasing the risk of hypothermia.
- Hydration Strategies:
- Regular Intake: Make a conscious effort to drink water regularly, even if you don’t feel thirsty. Aim for at least 2 to 3 liters per day, adjusting for activity level and altitude.
- Warm Beverages: Drinking warm fluids like herbal tea or broth can help maintain hydration and provide additional warmth. Avoid excessive caffeine and alcohol, as they can contribute to dehydration.
- Insulated Bottles: Use insulated water bottles or thermoses to prevent water from freezing. Store bottles upside down, as water freezes from the top, ensuring the opening remains unfrozen.
Importance of Nutrition
- Increased Caloric Needs: The body requires more energy in cold weather to maintain core temperature and perform physical activities. This means you need to consume more calories than you would in milder conditions.
- Nutritional Strategies:
- High-Energy Foods: Pack calorie-dense foods that provide a good balance of carbohydrates, proteins, and fats. Examples include nuts, trail mix, energy bars, cheese, and jerky.
- Frequent Meals: Eat small, frequent meals throughout the day to maintain energy levels and keep your metabolism active. This helps generate body heat and sustain physical performance.
- Easy-to-Prepare Meals: Choose meals that are simple to prepare in cold conditions, such as instant oatmeal, freeze-dried meals, or pasta. Pre-cook and package meals at home to reduce cooking time and fuel usage.
- Nighttime Nutrition: Eating a high-calorie snack before bed can help keep you warm through the night, as your body will have fuel to burn for heat production.
Practical Tips for Managing Hydration and Nutrition
- Meal Planning: Plan your meals and snacks ahead of time, ensuring you have enough food for the duration of your trip. Consider the weight and packability of your food, as well as your cooking capabilities in the field.
- Cooking Equipment: Bring a reliable stove and sufficient fuel for melting snow and cooking. In cold conditions, liquid fuel stoves are often more reliable than canister stoves.
- Monitor Your Body: Pay attention to signs of dehydration, such as dark urine, fatigue, or dizziness, and adjust your fluid intake accordingly. Similarly, listen to your body’s hunger cues and adjust your food intake as needed.
- Supplemental Electrolytes: Consider bringing electrolyte tablets or powders to replenish salts lost through sweat, especially if you are engaging in strenuous activities.
Ignoring hydration and nutrition can undermine your ability to stay warm, alert, and active during winter camping. By prioritizing regular hydration and consuming sufficient calories, you can enhance your body’s resilience to cold and maintain optimal performance. Thoughtful planning and preparation of meals and beverages will ensure you have the energy and warmth needed to fully enjoy your winter camping adventure.
7. Overlooking Fire Safety
Overlooking fire safety is a significant risk during winter camping, where a campfire can be both a source of warmth and a potential hazard. Proper fire management is crucial to prevent accidents, protect the environment, and ensure a safe camping experience. Here’s a detailed exploration of fire safety practices that every winter camper should follow.
Importance of Fire Safety
- Warmth and Cooking: A campfire provides essential warmth in cold conditions and serves as a means to cook food and boil water. However, the benefits of a campfire must be balanced with safety considerations to prevent wildfires and personal injury.
- Environmental Impact: Fires can cause lasting damage to the environment if not managed responsibly. This includes scarring the ground, damaging vegetation, and contributing to air pollution.
Safe Fire Building Practices
- Choosing a Safe Location:
- Distance from Tents: Build your fire at least 15 feet away from tents, gear, and flammable materials to prevent accidental ignition.
- Wind Considerations: Consider wind direction and strength when choosing a fire site. Wind can carry sparks and embers, increasing the risk of fire spreading.
- Natural Barriers: Use natural barriers like rocks or snow banks to shield the fire from wind and contain it within a designated area.
- Fire Pit Construction:
- Existing Fire Rings: Use established fire rings whenever possible to minimize environmental impact. If none are available, create a fire pit by clearing snow and debris and surrounding the area with rocks.
- Base Layer: In snowy conditions, build a base of packed snow or use a fire pan to prevent the fire from melting into the snow and becoming difficult to manage.
- Gathering Materials:
- Dry Wood: Collect dry wood from dead and downed trees. Avoid cutting live trees, as they contain moisture and do not burn efficiently.
- Kindling and Tinder: Gather small sticks, twigs, and natural tinder like birch bark or pine needles to help start the fire.
Fire Management and Safety
- Fire Size: Keep the fire small and manageable. A large fire consumes more resources and is harder to control.
- Supervision: Never leave a fire unattended. Assign someone to monitor the fire at all times, especially if the group is engaged in other activities.
- Extinguishing the Fire:
- Water and Stir Method: To fully extinguish a fire, pour water over the embers and stir the ashes with a stick to ensure all embers are wet and cool. Repeat this process until the fire is completely out and the ashes are cold to the touch.
- Snow and Dirt: In the absence of water, use snow or dirt to smother the fire, ensuring all embers are covered and extinguished.
- Leave No Trace: After extinguishing the fire, scatter the cold ashes and restore the site to its natural state as much as possible. This helps preserve the environment and reduces the visual impact of your campsite.
Alternatives to Campfires
- Portable Stoves: Consider using a portable camping stove for cooking and boiling water. Stoves are efficient, leave no trace, and reduce the need for firewood.
- Lanterns and Heaters: Use battery-powered lanterns or propane heaters for light and warmth, especially in areas where campfires are prohibited or impractical.
Overlooking fire safety can lead to dangerous situations and environmental damage. By following safe fire-building practices, managing the fire responsibly, and ensuring it is fully extinguished, campers can enjoy the benefits of a campfire while minimizing risks. Additionally, considering alternatives to traditional campfires can further enhance safety and environmental stewardship during winter camping adventures.
8. Inadequate Lighting
Inadequate lighting is a common oversight in winter camping that can lead to difficulties in performing essential tasks and increase the risk of accidents. The long nights and early sunsets of winter mean that campers spend more time in the dark, making reliable lighting crucial for safety, navigation, and comfort. Here’s a detailed exploration of how to effectively manage lighting during winter camping.
Importance of Adequate Lighting
- Safety and Navigation: Proper lighting is essential for safely navigating around the campsite, especially in uneven or icy terrain. It helps prevent trips, falls, and other accidents that can occur in low visibility.
- Task Efficiency: Adequate lighting is necessary for performing tasks such as cooking, setting up or breaking down camp, and reading maps. It also aids in emergency situations where quick and clear visibility is required.
- Comfort and Morale: Good lighting can enhance the overall camping experience by providing a sense of security and comfort. It allows for social activities and relaxation after dark, contributing to a more enjoyable trip.
Types of Lighting and Their Uses
- Headlamps:
- Hands-Free Operation: Headlamps are ideal for hands-free tasks, allowing you to focus light exactly where you need it while keeping your hands free for other activities.
- Adjustable Settings: Many headlamps come with adjustable brightness settings and beam angles, making them versatile for different tasks and conserving battery life.
- Lanterns:
- Area Lighting: Lanterns provide ambient light for larger areas, making them suitable for illuminating the inside of a tent or a communal cooking area.
- Solar-Powered and Rechargeable Options: Consider using solar-powered or rechargeable lanterns to reduce reliance on disposable batteries and ensure a sustainable light source.
- Flashlights:
- Focused Beam: Flashlights offer a focused beam of light, useful for signaling or when a concentrated light source is needed.
- Backup Option: Keep a flashlight as a backup to your primary lighting sources, ensuring you have a reliable light in case of headlamp or lantern failure.
Lighting Management and Tips
- Extra Batteries: Always bring extra batteries for all battery-operated devices. Cold temperatures can drain batteries faster, so store them in a warm place, such as inside your jacket, to preserve their charge.
- Battery Alternatives: Consider using lithium batteries, which perform better in cold conditions compared to alkaline batteries. Rechargeable batteries are also an option, but ensure you have a way to recharge them, such as a portable power bank.
- Lighting Redundancy: Have multiple light sources available to ensure you are not left in the dark if one fails. This redundancy is crucial for safety and convenience.
- Light Discipline: Practice light discipline by using the lowest effective brightness setting to conserve battery life. Red light modes on headlamps are useful for preserving night vision and minimizing disturbance to others.
- Reflective Gear: Use reflective tape or gear to enhance visibility around the campsite. This can help you locate items and navigate safely in low-light conditions.
- Emergency Lighting: Consider carrying a small, lightweight emergency light, such as a keychain LED, for unexpected situations.
Inadequate lighting can compromise safety and comfort during winter camping. By selecting the right combination of lighting tools, managing battery life, and ensuring redundancy, campers can effectively illuminate their environment and enhance their overall experience. Proper lighting not only facilitates essential tasks but also contributes to a safer and more enjoyable winter camping adventure.
9. Failing to Test Gear
Failing to test gear before embarking on a winter camping trip can lead to a range of issues, from minor inconveniences to serious safety hazards. Winter conditions can be unforgiving, and having reliable, well-functioning equipment is crucial for a successful and enjoyable experience. Here’s a detailed exploration of why testing gear is important and how to effectively prepare your equipment for winter camping.
Importance of Testing Gear
- Familiarity and Confidence: Testing your gear at home allows you to become familiar with its setup and operation. This familiarity builds confidence and ensures you can efficiently use your equipment in cold and potentially challenging conditions.
- Identifying Defects or Malfunctions: Testing helps identify any defects, malfunctions, or missing components in your gear. Discovering these issues at home gives you the opportunity to repair or replace items before they become a problem in the field.
- Adapting to Conditions: Winter camping requires specific gear adaptations, such as using a stove that performs well in cold temperatures or ensuring your sleeping system is adequately insulated. Testing helps confirm that your gear meets these requirements.
Key Gear to Test
- Shelter (Tent or Hammock):
- Setup Practice: Set up your tent or hammock at home to ensure you understand the process and can do it efficiently. Practice in different conditions, such as in the dark or with gloves on, to simulate real camping scenarios.
- Inspect for Damage: Check for any tears, broken poles, or missing stakes. Ensure zippers and seams are in good condition and that the rainfly provides full coverage.
- Sleeping System:
- Sleeping Bag and Pad: Test your sleeping bag and pad to ensure they provide adequate warmth and comfort. Check the temperature rating of your sleeping bag and consider using a liner for additional insulation.
- Hammock Insulation: If using a hammock, test your underquilt or sleeping pad to ensure it fits properly and provides sufficient insulation.
- Cooking Equipment:
- Stove Operation: Test your stove to ensure it lights and operates correctly. Practice assembling and disassembling it, and check for fuel leaks or blockages.
- Fuel Efficiency: Verify that you have enough fuel for your trip, considering the increased consumption in cold weather. Test how long it takes to boil water to gauge fuel efficiency.
- Clothing and Footwear:
- Layering System: Wear your clothing layers to ensure they fit comfortably and provide adequate warmth. Test mobility and comfort, especially with gloves and boots.
- Waterproofing: Check that your outer layers are waterproof and windproof. Test footwear for warmth and traction on snow and ice.
- Lighting and Navigation:
- Headlamps and Lanterns: Test all lighting equipment to ensure it functions properly. Check battery life and carry spares.
- Navigation Tools: Familiarize yourself with any GPS devices, maps, or compasses you plan to use. Ensure they are in good working order.
Additional Testing Tips
- Simulate Conditions: If possible, test your gear in conditions similar to those you expect to encounter. This can help identify any additional adjustments or gear you might need.
- Checklists: Create a checklist of all gear to ensure nothing is forgotten. Use this checklist during testing to verify that each item is accounted for and functional.
- Repairs and Maintenance: Perform any necessary repairs or maintenance on gear before your trip. This includes sharpening tools, re-waterproofing clothing, and replacing worn parts.
Failing to test gear can lead to unexpected challenges and compromise the safety and enjoyment of your winter camping trip. By thoroughly testing and familiarizing yourself with your equipment, you can ensure it performs reliably in the field. This preparation not only enhances your confidence and efficiency but also contributes to a safer and more rewarding winter camping experience.
10. Underestimating the Cold
Underestimating the cold is a common mistake that can lead to discomfort, hypothermia, and other cold-related issues during winter camping. The cold can be more intense than anticipated, especially at night when temperatures can drop significantly. Proper preparation and understanding of how to manage cold conditions are essential for a safe and enjoyable camping experience. Here’s a detailed exploration of how to effectively prepare for and manage cold temperatures during winter camping.
Understanding Cold Weather Challenges
- Temperature Variability: Weather forecasts provide an estimate, but actual conditions can vary due to factors like elevation, wind chill, and microclimates. Nighttime temperatures can be much lower than daytime highs, and clear skies can lead to rapid heat loss.
- Wind Chill: Wind chill can make the air feel significantly colder than the actual temperature. It increases the rate of heat loss from the body, making it crucial to account for wind conditions when preparing for cold weather.
- Moisture and Humidity: Cold air can hold less moisture, leading to dry conditions that can exacerbate heat loss. However, moisture from sweat or precipitation can quickly lead to chilling if not managed properly.
Strategies for Preparing for the Cold
- Layering System:
- Base Layer: Start with a moisture-wicking base layer to keep sweat away from your skin. Materials like merino wool or synthetic fibers are ideal.
- Insulating Layer: Add one or more insulating layers, such as fleece or down, to trap body heat. Consider carrying an extra insulating layer for unexpected cold snaps.
- Outer Layer: Use a waterproof and windproof outer layer to protect against wind chill and precipitation. Ensure it is breathable to allow moisture to escape.
- Sleeping System:
- Sleeping Bag: Choose a sleeping bag rated for temperatures lower than the forecasted lows. Consider using a sleeping bag liner, which can add extra warmth and extend the temperature range of your bag.
- Sleeping Pad: Use a sleeping pad with a high R-value to insulate against the cold ground. In extreme conditions, consider using two pads for additional insulation.
- Clothing for Sleep: Wear dry, warm clothing to bed, including thermal layers and a hat. Avoid overdressing, as this can lead to sweating and moisture buildup.
- Additional Warmth Strategies:
- Hot Water Bottles: Fill a water bottle with hot water and place it in your sleeping bag before bed to provide additional warmth.
- Hand and Foot Warmers: Use chemical hand and foot warmers for extra warmth in extremities, which are more susceptible to cold.
- Shelter Setup: Ensure your tent or hammock is set up to minimize wind exposure and retain heat. Use a tarp or additional windbreaks if necessary.
- Nutrition and Hydration:
- Caloric Intake: Consume high-calorie foods to fuel your body’s heat production. Eating a warm meal before bed can help maintain body temperature overnight.
- Hydration: Stay hydrated, as dehydration can impair your body’s ability to regulate temperature. Drink warm fluids to maintain hydration and warmth.
- Monitoring and Adjustments:
- Weather Monitoring: Continuously monitor weather conditions and be prepared to adjust your plans if temperatures drop unexpectedly.
- Emergency Preparedness: Have a plan for dealing with extreme cold, such as retreating to a warmer location or using emergency gear like a bivy sack.
Underestimating the cold can lead to serious consequences during winter camping, but with proper preparation and strategies, you can effectively manage cold conditions. By understanding the challenges posed by cold weather and taking proactive measures to stay warm, you can enhance your safety and comfort. This preparation not only ensures a more enjoyable camping experience but also helps protect against the risks associated with extreme cold.
Conclusion
Winter camping offers a unique opportunity to experience the natural world in its most serene and pristine state. The snow-covered landscapes, crisp air, and quietude of the winter wilderness provide a backdrop for adventure and reflection. However, the challenges posed by cold weather, shorter daylight hours, and unpredictable conditions require a heightened level of preparation and awareness. By avoiding common mistakes, campers can ensure a safe and enjoyable experience, fully appreciating the beauty and tranquility that winter camping has to offer.
The Importance of Preparation
- Safety First: The primary goal of preparation is to ensure safety. Winter conditions can be harsh and unforgiving, with risks such as hypothermia, frostbite, and avalanches. Thorough preparation helps mitigate these risks, allowing campers to focus on enjoying their surroundings.
- Enhanced Enjoyment: Proper preparation enhances the overall enjoyment of the trip. When campers are warm, well-fed, and comfortable, they can fully engage with the experience, whether it’s exploring snow-covered trails, stargazing on a clear winter night, or simply enjoying the peace and quiet of a remote campsite.
- Confidence and Peace of Mind: Knowing that you are well-prepared instills confidence and peace of mind. This mental assurance allows campers to tackle challenges with a positive attitude and adapt to changing conditions with resilience.
Key Areas of Focus
- Gear and Equipment: Selecting and testing the right gear is crucial. This includes choosing appropriate clothing layers, reliable shelter, and efficient cooking equipment. Testing gear at home ensures familiarity and functionality, reducing the likelihood of equipment failure in the field.
- Site Selection and Shelter Setup: Choosing the right campsite and setting up shelter properly are essential for protection against the elements. Understanding how to create a stable, insulated, and wind-resistant setup can significantly impact comfort and safety.
- Weather Awareness: Monitoring weather conditions and understanding their implications is vital. Being prepared for sudden changes in weather, such as snowstorms or temperature drops, allows campers to adjust plans and gear accordingly.
- Hydration and Nutrition: Maintaining proper hydration and nutrition is critical for energy and warmth. High-calorie foods and regular fluid intake support the body’s ability to generate heat and sustain physical activity.
- Fire Safety and Lighting: Managing fire safety and ensuring adequate lighting are important for warmth, cooking, and navigation. Proper fire management prevents accidents, while reliable lighting enhances safety and convenience during long winter nights.
Appreciating the Winter Wilderness
- Connection with Nature: Winter camping provides a unique opportunity to connect with nature in a way that is different from other seasons. The quiet and solitude of winter landscapes offer a chance for reflection and appreciation of the natural world.
- Unique Experiences: Activities such as snowshoeing, cross-country skiing, and wildlife tracking are unique to winter camping. These experiences allow campers to explore and enjoy the winter environment in ways that are not possible during other times of the year.
- Building Skills and Resilience: Winter camping challenges campers to develop skills and resilience. Overcoming the challenges of cold weather and adapting to the environment fosters a sense of accomplishment and personal growth.
Winter camping requires a comprehensive approach to preparation and awareness. By avoiding common mistakes and focusing on key areas such as gear, site selection, weather, hydration, and safety, campers can enhance their safety and enjoyment. Whether you prefer the traditional shelter of a tent or the minimalist appeal of a hammock, being well-prepared is the key to a successful winter camping experience. Embracing the beauty and tranquility of the winter wilderness, campers can create lasting memories and deepen their connection with the natural world.


Leave a Reply