
For overlanders and dispersed campers, reliable communication is more than a convenience—it’s a lifeline. Whether you’re traversing remote forest roads or setting up camp miles from the nearest cell tower, integrating a robust radio system into your vehicle can make the difference between a minor hiccup and a major emergency. This essay explores five essential upgrades for equipping your rig with GMRS or HAM radios, focusing on practical integration, antenna mounting, and power management.
1. Choosing the Right Radio: GMRS vs. HAM
The decision between GMRS and HAM radio is foundational for any overlander planning to venture beyond the reach of cell service. Each system brings its own strengths and limitations, shaped by regulatory requirements, technical capabilities, and the practical realities of life on the trail.
GMRS, or General Mobile Radio Service, is often the entry point for many overlanders. Its appeal lies in its simplicity and accessibility. Obtaining a GMRS license is straightforward—there’s no exam, only a modest fee, and the license covers your entire family. GMRS radios are designed for ease of use, with familiar walkie-talkie-style handsets and vehicle-mounted units that can be operated with minimal technical knowledge. The communication range is generally sufficient for keeping in touch with fellow travelers within a convoy, coordinating campsites, or calling for help within a few miles. GMRS channels are standardized, making it easy to communicate with other overlanders, off-roaders, or even park rangers who use compatible systems. For group travel, GMRS is often the default choice, providing reliable, clear communication without the need for specialized training.
HAM radio, or Amateur Radio, opens up a broader spectrum of possibilities. Unlike GMRS, HAM requires passing a licensing exam, which introduces users to basic radio theory, regulations, and operating practices. This extra step is rewarded with access to a much wider range of frequencies, higher power limits, and the ability to use repeaters—relay stations that can dramatically extend your communication range, sometimes hundreds of miles. HAM radios are highly customizable, supporting everything from voice to digital data and even satellite communication. For solo travelers, those venturing into truly remote areas, or anyone who wants the security of being able to reach help far beyond line-of-sight, HAM radio is unmatched. The community of HAM operators is also a valuable resource, offering support, information, and a sense of camaraderie.
Many experienced overlanders ultimately choose to integrate both systems into their vehicles. GMRS serves as the backbone for day-to-day group communication, while HAM stands ready for long-range check-ins, weather updates, or emergencies. This dual-radio approach ensures that you’re prepared for both the routine and the unexpected, leveraging the strengths of each system. The choice between GMRS and HAM is not merely technical—it reflects your travel style, your willingness to learn, and your commitment to safety and preparedness on the road less traveled.
Choosing between GMRS and HAM radio is a key decision for overlanders, as each offers distinct advantages. GMRS is simple to use, requires only a basic license with no exam, and is ideal for group communication within a few miles—making it the go-to for most convoy and family travel. HAM radio, while requiring a licensing exam, provides far greater range, flexibility, and access to repeaters, making it invaluable for solo travelers or those venturing into remote areas. Many overlanders opt for both: GMRS for everyday coordination and HAM for long-distance or emergency communication. Ultimately, the choice reflects your travel needs, willingness to learn, and commitment to safety.
2. Antenna Mounting: Maximizing Range and Reliability
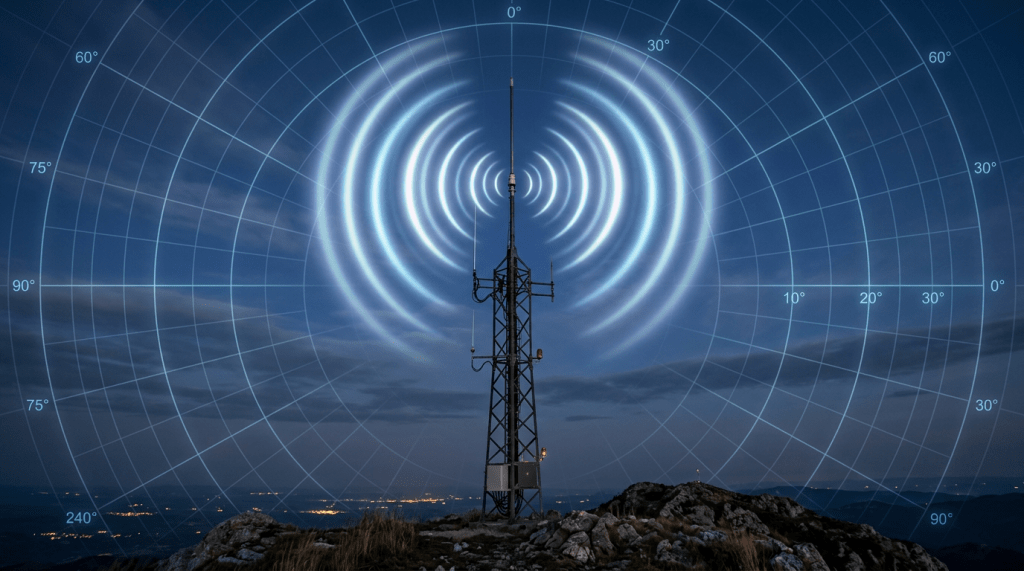
The effectiveness of any radio system in an overlanding vehicle hinges on the quality and placement of its antenna. While the radio itself handles the transmission and reception of signals, it is the antenna that determines how far and how clearly those signals travel. In remote environments, where every bit of range and reliability counts, thoughtful antenna mounting becomes essential.
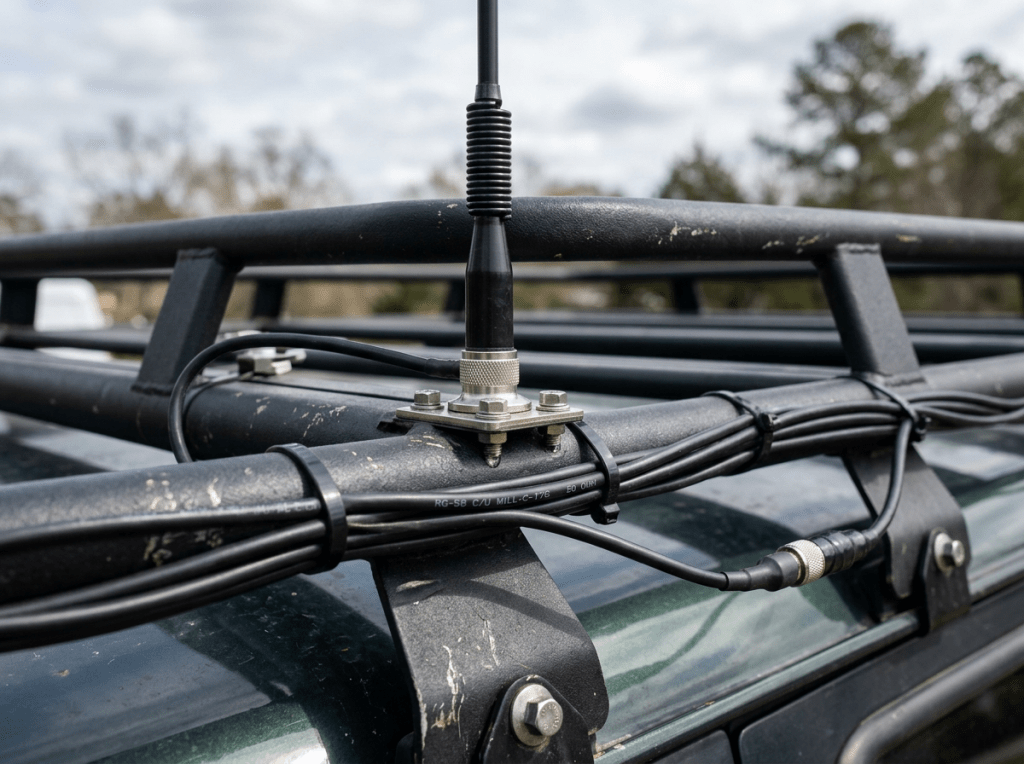
The location of the antenna on your vehicle plays a significant role in its performance. Mounting the antenna on the roof is often considered the gold standard, as it provides an unobstructed 360-degree field and the best possible ground plane, which is the reflective surface that helps radiate the signal efficiently. A roof-mounted antenna is less likely to be blocked by the vehicle’s body, ensuring that your transmissions are as strong and clear as possible in all directions. However, some vehicles or setups may make roof mounting impractical, in which case the hood or fender can be a good alternative, still offering a relatively high and open position.
The type of mount you choose also affects both the durability and convenience of your setup. Magnetic mounts are popular for their ease of installation and flexibility—they can be moved or removed without drilling holes or making permanent modifications. However, they may not be secure enough for the rigors of off-road travel, where vibrations and impacts can dislodge them. Permanent mounts, such as NMO (New Motorola) or lip mounts, require a more involved installation process but provide a much more stable and reliable connection. These mounts are designed to withstand the bumps and jolts of rough terrain, making them a better choice for serious overlanders who expect to encounter challenging conditions.
Antenna height is another critical factor. In general, the higher the antenna, the better the range, as it can transmit and receive signals over greater distances and obstacles. However, there is a practical limit—an antenna that is too tall can become a liability, catching on low branches or overhangs and potentially being damaged. Overlanders must strike a balance between maximizing height for performance and keeping the antenna low enough to avoid frequent impacts. A common and effective solution is the 1/4-wave NMO-mounted antenna, which offers a good compromise between range, durability, and clearance for most vehicles.
Ultimately, the goal of antenna mounting is to ensure that your radio system is as reliable as possible, no matter where your travels take you. By carefully considering location, mount type, and height, you can significantly enhance your ability to communicate in remote areas, making your overlanding experience safer and more connected.
When selecting an antenna for your overlanding radio setup, the choice between a 1/4-wave and a 5/8-wave antenna (often mistakenly referred to as 3/5) is significant, as each offers distinct performance characteristics. A 1/4-wave antenna is typically shorter and more compact, making it less prone to snagging on branches or obstacles—a practical advantage for vehicles navigating dense forests or rugged trails. It radiates its signal in a more spherical pattern, which can be beneficial in hilly or uneven terrain where signals need to travel both horizontally and vertically. In contrast, a 5/8-wave antenna is longer and designed to focus more of its energy horizontally, resulting in greater range on flat, open ground. This makes the 5/8-wave ideal for desert crossings or prairie travel, where maximizing distance is a priority. However, its increased length can make it more vulnerable to damage and less convenient in wooded or urban environments. Ultimately, the choice comes down to your typical travel conditions: a 1/4-wave antenna offers durability and versatility for mixed terrain, while a 5/8-wave provides superior range when open, unobstructed communication is the goal.
Antenna mounting is crucial for maximizing the range and reliability of your overlanding radio system. The placement, such as on the roof, offers the best signal coverage and ground plane, while alternatives like the hood or fender can still provide good performance if roof mounting isn’t feasible. The choice between magnetic and permanent mounts affects both convenience and durability, with permanent mounts being more secure for rough terrain. Antenna height also matters—higher antennas generally improve range but must be balanced against the risk of damage from low obstacles. When choosing between a 1/4-wave and a 5/8-wave antenna, it’s important to consider your typical travel environment: a 1/4-wave antenna is shorter, more durable, and radiates in a spherical pattern, making it ideal for mixed or hilly terrain, while a 5/8-wave antenna is longer and focuses its signal horizontally, offering greater range on flat, open ground but being more susceptible to damage. Ultimately, thoughtful consideration of location, mount type, height, and antenna design ensures your radio remains dependable, keeping you connected and safe in remote environments.
3. Power Management: Ensuring Reliable Operation
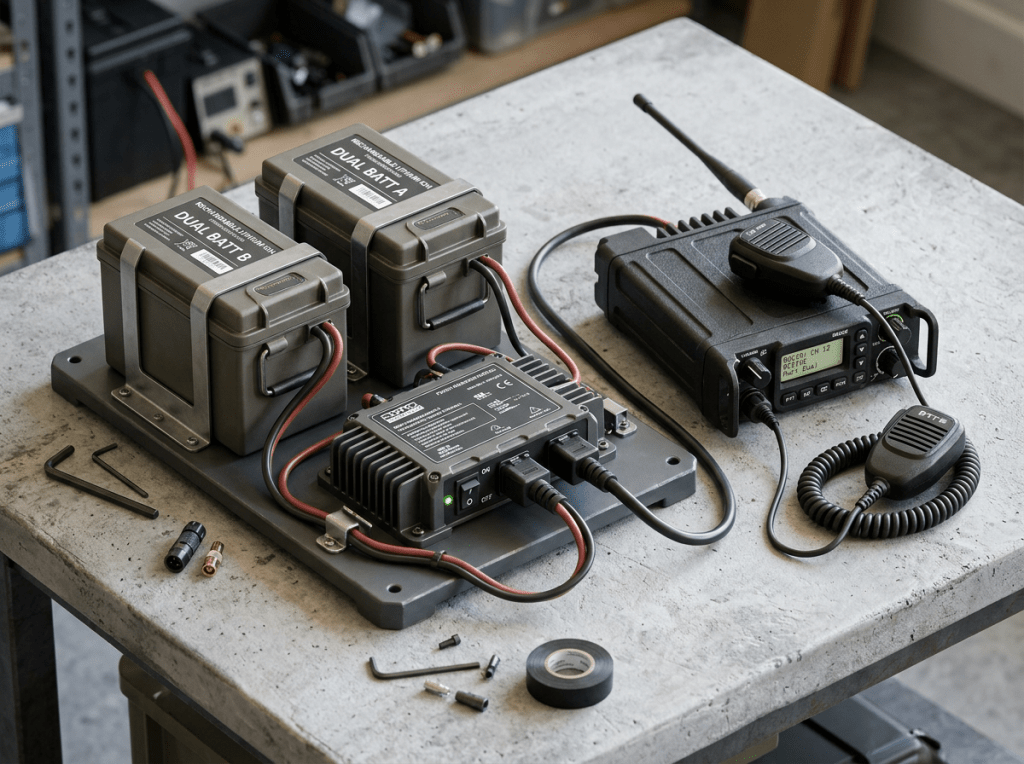
Power management is a critical aspect of integrating radios into an overlanding vehicle, as reliable communication depends on a stable and sufficient power supply. Radios, particularly those operating at higher wattages for extended range, can place a considerable load on your vehicle’s electrical system. Without proper planning, this can lead to issues ranging from signal interference to the risk of draining your starter battery, potentially leaving you stranded in remote locations.
A well-designed power setup begins with how the radio is connected to the vehicle’s electrical system. Running power cables directly to the battery is widely regarded as the best approach, as it minimizes voltage drop and reduces the likelihood of electrical noise or interference from other vehicle systems. This direct connection ensures that your radio receives consistent voltage, which is essential for maintaining clear transmissions and preventing unexpected shutdowns during critical moments.
Safety is another key consideration. Incorporating inline fuses into the power circuit is essential for protecting both the radio and the vehicle’s wiring from electrical faults, such as short circuits or power surges. A blown fuse will interrupt the circuit before any serious damage can occur, providing peace of mind when operating in challenging environments where help may be far away.
As overlanding vehicles often support a range of electronic devices—radios, lights, refrigerators, and more—managing these connections efficiently becomes important. Power distribution blocks offer a practical solution, allowing you to organize and consolidate multiple power lines into a single, accessible location. This not only simplifies installation and troubleshooting but also helps maintain a tidy and safe electrical system, reducing the risk of accidental disconnections or tangled wires.
For those who spend extended periods off-grid or rely heavily on their radios, the addition of a dedicated auxiliary battery can be a game-changer. By isolating the radio and other accessories from the main starter battery, you ensure that essential communications equipment remains operational without jeopardizing your ability to start the engine. This setup is especially valuable during long nights at camp or in emergency situations where maintaining contact is vital.
Ultimately, thoughtful power management is about more than just keeping your radio running—it’s about ensuring that your entire communication system remains robust, safe, and dependable, no matter how far you roam from civilization.
Effective power management is essential for reliable radio operation in overlanding vehicles, as radios can draw significant power, especially at higher wattages. Connecting the radio directly to the battery minimizes voltage drop and interference, while inline fuses protect against electrical faults. Using power distribution blocks helps organize multiple devices and keeps the system safe and tidy. For those spending extended time off-grid, a dedicated auxiliary battery ensures the radio and other accessories don’t drain the starter battery, maintaining both communication and the ability to start the vehicle. Ultimately, careful power management safeguards your communication system, ensuring it remains dependable wherever your travels take you.
4. Mounting and Ergonomics: Keeping Controls Accessible
The placement and accessibility of your radio controls are just as important as the technical aspects of your communication setup. In the dynamic environment of overlanding, where attention must be divided between navigating rough terrain and monitoring your surroundings, a poorly mounted radio can quickly become a safety risk. If you have to stretch, fumble, or take your eyes off the road to adjust settings or respond to a call, you increase the likelihood of accidents or missed communications.
Thoughtful mounting begins with positioning the radio where it can be easily seen and reached from the driver’s seat. Dash or console mounts are popular choices because they keep the radio’s controls and display within your natural line of sight and arm’s reach. This allows you to make quick adjustments or respond to transmissions without diverting your focus from driving. For vehicles with limited dash space or more complex setups, radios with remote heads offer even greater flexibility. These systems separate the main radio unit from the control interface, allowing you to mount the display and microphone wherever it’s most convenient—on the dash, overhead, or even on a custom bracket—while tucking the bulkier radio body out of the way.
Cable management is another crucial aspect of ergonomic installation. In the confined space of a vehicle cabin, loose or tangled cables can snag on gear, interfere with shifting or pedal operation, or even become disconnected at inopportune moments. Using cable clips, sleeves, or routing channels helps keep everything organized and secure, reducing clutter and the risk of accidental disconnections. A clean, well-managed installation not only looks professional but also contributes to the overall safety and reliability of your communication system.
Ultimately, prioritizing mounting and ergonomics ensures that your radio is always ready for use, allowing you to communicate efficiently and safely, no matter how challenging the conditions become. By integrating your radio seamlessly into your driving environment, you enhance both convenience and peace of mind on every journey.
Proper mounting and ergonomic placement of your radio are essential for safe and efficient communication while overlanding. Keeping controls within easy reach and in your line of sight allows you to operate the radio without distraction, reducing the risk of accidents or missed messages. Remote head units offer flexible installation options for tight spaces, while good cable management prevents tangles and accidental disconnections. Ultimately, a thoughtfully integrated radio setup ensures you can communicate reliably and safely, enhancing both convenience and peace of mind on the trail.
5. Weatherproofing and Durability: Preparing for the Elements
When venturing off the beaten path, your vehicle and all its equipment are subjected to a relentless barrage of environmental challenges. Radios, in particular, are vulnerable to the harsh realities of overlanding—dust swirling through open windows, sudden downpours, river crossings, and the constant jarring of rough trails. Ensuring your radio setup is both weatherproof and durable is not just about protecting your investment; it’s about guaranteeing reliable communication when you need it most.
One of the most effective ways to safeguard your radio is by housing it in a weatherproof enclosure. These protective cases are designed to keep out dust and moisture, two of the most common culprits behind electronic failure in the field. A well-sealed enclosure acts as a barrier, preventing fine particles from infiltrating sensitive circuitry and stopping water from causing short circuits or corrosion. This is especially important for radios mounted in exposed locations, such as open vehicles or external compartments, where the risk of environmental exposure is highest.
Equally important are the connections that link your radio to its antenna and power source. Even the most robust radio can be compromised by a single weak point where water or dust can enter. Gasketed connectors, which use rubber or silicone seals, provide a tight, weather-resistant fit at these critical junctions. By preventing water ingress at the antenna base or power plug, these connectors help maintain signal integrity and prevent corrosion that could degrade performance over time.
Vibration is another persistent threat in the overlanding world. The constant shaking and jolting of off-road travel can loosen connections, damage internal components, or even cause complete equipment failure. To counteract this, many overlanders use shock mounts or vibration-dampening brackets when installing their radios. These mounts absorb and dissipate the energy from bumps and ruts, protecting delicate electronics from the cumulative effects of rough terrain.
Ultimately, investing in weatherproofing and durability measures is about more than just prolonging the life of your radio—it’s about ensuring that your communication system remains functional and dependable, no matter how challenging the conditions become. By anticipating the elements and taking proactive steps to shield your equipment, you can travel with greater confidence, knowing that your lifeline to the outside world is as rugged as the landscapes you explore.
Weatherproofing and durability are essential for maintaining reliable radio communication during overlanding, where equipment faces constant exposure to dust, moisture, and vibration. Using weatherproof enclosures protects sensitive electronics from environmental hazards, while gasketed connectors seal out water and dust at critical connection points, preserving signal quality and preventing corrosion. Shock mounts or vibration-dampening brackets further safeguard radios from the jolts and bumps of rough terrain. Ultimately, these protective measures ensure your radio system remains functional and dependable, allowing you to communicate confidently no matter how harsh the conditions.
Summary Table: 5 Essential Upgrades
| Upgrade Area | Key Benefit | Example Solution |
|---|---|---|
| Radio Selection | Range & flexibility | Dual GMRS/HAM setup |
| Antenna Mounting | Signal strength & reliability | NMO roof mount, 1/4-wave antenna |
| Power Management | Consistent, safe operation | Direct-to-battery, fuse block |
| Mounting/Ergonomics | Safe, easy access | Dash mount, remote head |
| Weatherproofing | Longevity in harsh conditions | Sealed enclosures, shock mounts |
Conclusion
Bringing GMRS or HAM radios into your overlanding vehicle transforms your journey from a simple adventure into a well-prepared expedition. This integration is not merely about adding another gadget to your dashboard; it’s about building a foundation of safety and self-reliance that extends far beyond the reach of cell towers and paved roads. The process of selecting the right radio, mounting the antenna for optimal performance, managing power effectively, ensuring ergonomic access, and weatherproofing your setup reflects a commitment to thoughtful preparation. Each of these elements works together to create a communication system that can withstand the unpredictable challenges of remote travel.
A robust radio setup empowers you to stay connected in ways that are vital for both routine and emergency situations. It allows you to coordinate seamlessly with fellow travelers, receive timely weather updates, and, most importantly, call for assistance when the unexpected occurs. The confidence that comes from knowing you have a reliable line of communication can transform your experience, allowing you to explore further and with greater peace of mind. In the world of overlanding, where conditions can change rapidly and help may be hours or even days away, this level of preparedness is invaluable.
Ultimately, investing in a comprehensive radio system is an investment in your own capability and resilience. It is a testament to the overlander’s ethos of self-sufficiency and respect for the wild places we seek to explore. By making your communications gear as rugged and dependable as your vehicle, you ensure that every journey is not only an adventure, but a safe and connected one.
Integrating GMRS or HAM radios into your overlanding vehicle elevates your trip from a basic adventure to a well-prepared expedition, prioritizing safety and self-reliance beyond the limits of cell service. Thoughtful choices in radio selection, antenna mounting, power management, ergonomics, and weatherproofing all contribute to a communication system that can handle the unpredictability of remote travel. With a reliable radio setup, you gain the confidence to coordinate with others, access vital information, and call for help if needed, making every journey safer and more connected. Ultimately, investing in robust communications gear is a reflection of the overlander’s commitment to preparedness and respect for the challenges of the wild.


Leave a Reply