
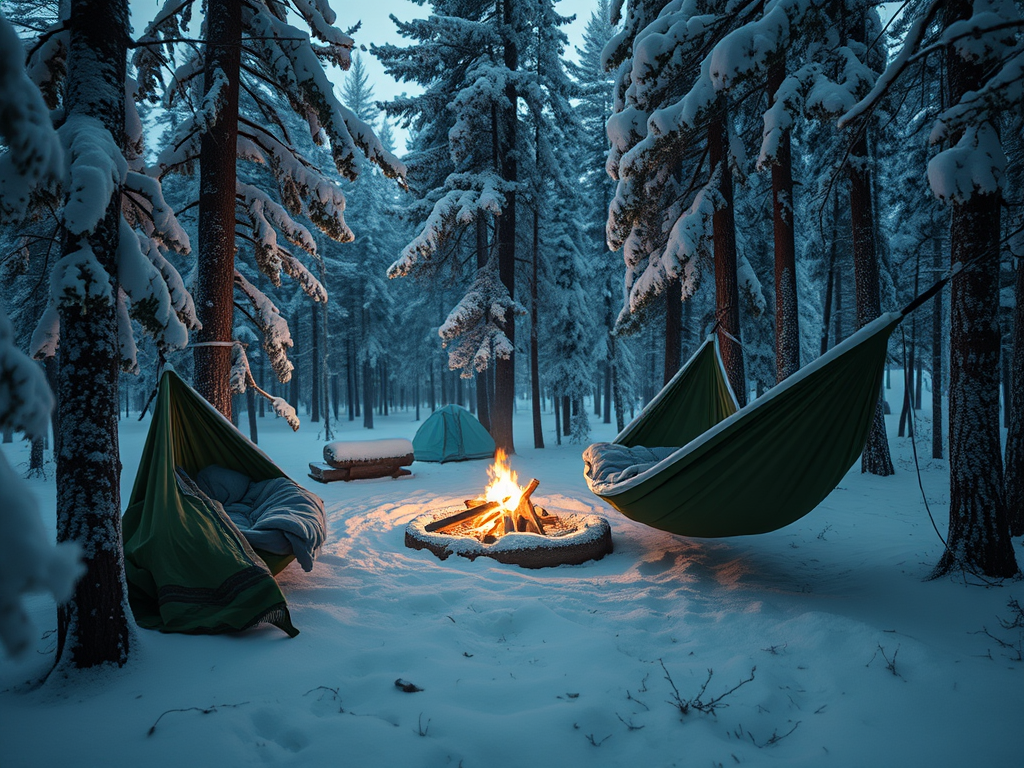
Winter stealth camping is an adventure that combines the thrill of off-grid living with the challenges of cold weather survival. Whether you’re seeking solitude, saving money, or simply testing your skills, winter stealth camping requires careful planning, respect for the environment, and a heightened sense of discretion. Here’s a practical guide to the dos and don’ts to help you stay safe, comfortable, and undetected.
Do: Plan and Prepare Thoroughly — Research Your Location
Good location research is the single best predictor of a safe, discreet, and enjoyable winter stealth trip. Below is a practical, step‑by‑step expansion of the two short items you quoted, with concrete tactics, tools, and safety considerations.
Define your stealth profile and constraints
- Decide the type of stealth you want: rural backcountry, forest fringe, or urban/edge stealth — each needs different checks.
- Set operational limits: how far you’ll hike after dark, how long you’ll stay, and whether you’ll accept the risk of limited cell service.
- Pick a backup plan: at least one alternate campsite and an emergency extraction route.
Check legal status and land ownership first
- Confirm who owns the land (federal, state, municipal, private), and whether dispersed or overnight camping is allowed in winter.
- Search for local rules and seasonal closures:
- US examples: USFS/BLM websites, state park pages, county ordinances.
- Outside the US: national park services, local land regulators.
- Watch for special restrictions: wildlife wintering areas, habitat restoration, avalanche control zones, road gates closed in winter.
- If private land is the only option, get written permission from the landowner in advance.
Tools:
- OnX/BuyMeAPark/Right of Way overlays for land ownership.
- Official agency webpages and posted notices.
Do desk reconnaissance with maps and satellite imagery
- Start with multiple layers:
- Satellite imagery (Google Earth, Bing, ESRI) to spot clearings, trailheads, parking, buildings, and visual concealment.
- Topographic maps (USGS, CalTopo, OpenTopo) for contour, benches, slopes, and drainage.
- Land-use/parcel maps to confirm property lines.
- Inspect imagery carefully:
- Leaf‑off imagery (winter/early-spring) often reveals trails, game paths, and old roads hidden in summer.
- Look for windblown snow patterns, snowmobile tracks, snowplow routes, or cleared areas that show human use.
- Identify candidate zones, then mark specific micro-sites that:
- Are off main trails and roads.
- Have tree cover or terrain features to hide approach and silhouette.
- Offer escape routes and multiple exit directions.
Tools:
- Google Earth Pro (historical imagery).
- CalTopo, Gaia GPS, or Maps.me for overlaying layers.
- Local GIS/parcel search for property boundaries.
Interpret topography and micro-site selection
- Favor sheltered, level benches for sleeping — avoid hollows that collect cold air and are hard to exit.
- Avoid terrain traps (ravines, gullies, and depressions) where cold and wind can concentrate, and where rescue is harder.
- Consider sun and wind:
- South- or southwest-facing slopes get more daytime warming (good for melt-water and daytime warmth).
- Windward ridges are colder and wind-scoured; leeward sides may have deeper, wind-packed drifts but more shelter.
- Beware tree hazards:
- Avoid camping under dead limbs (“widowmakers”) or heavy snow load branches.
- Watch out for tree wells (deep voids around trunk bases) near conifers — dangerous if you fall in.
Pack the Right Gear
Good gear is the difference between a miserable night and a confident, safe winter stealth camp. Below is a focused breakdown of essential systems, recommended specs, practical tips, and stealth-specific considerations.
Shelter: tents, bivies, tarps
- Types & when to use
- Four‑season tent (geodesic or semi‑geodesic): best for exposed, windy, snowy sites; stable and warm. Choose double‑wall for condensation control unless you’re experienced with single‑wall.
- Bivy sack or single‑person shelter: ultra‑low profile and stealthy for forest‑edge or urban edge camps; more condensation risk and less interior space.
- Tarp + trekking‑pole lean‑to: lightweight and low‑visibility in tree cover; only for mild winter conditions and experienced campers.
- Snow bivy / igloo / quinzhee: emergency options or planned snow shelters—time consuming but effective.
- Key features to prioritize
- Low silhouette and earth-tone color for discretion.
- Strong pole geometry and snow‑capable vestibules.
- Quality zippers and multiple guy points for wind.
- Durable rainfly and footprint to reduce heat loss to wet snow.
- Setup tips
- Clear a flat platform, tamp snow down to create a wind‑packed surface (or build a platform).
- Use snow anchors or buried stuff sacks for guy lines.
- Pitch with door facing away from prevailing winds and away from trails/lines of sight.
Sleeping System: bag + pad
- Sleeping bag selection
- Use a bag rated lower than the expected overnight temperature—a common rule: choose a bag with a comfort limit at least 10–20°F (6–11°C) below the coldest forecasted temperature.
- Down vs synthetic:
- Down: best warmth-to-weight and compressibility; needs a dry sleep system or hydrophobic down for damp environments.
- Synthetic: heavier but retains insulating properties when wet and is cheaper to warm up a bivy.
- Construction: stitched‑through for lightness or baffled box for cold; hood, draft collar, and zipper draft tube are crucial.
- Sleeping pad selection
- Aim for high R‑value: winter pads generally R4+; deep cold or snow camping often needs R5–R7.
- Closed‑cell foam pad + insulated inflatable combo gives redundancy and protection from punctures; the foam also makes good stealth seating.
- Inflate the pad off your body to minimize heat loss; place a closed‑cell or reflective foam under inflatable in very cold ground.
- Practical habits
- Sleep in dry base layers; change into dry socks and hat before bed.
- Keep clothing and electronics inside the tent and off the cold ground.
- Use a liner to add warmth and keep bag cleaner.
Clothing System: layers & accessories
- Layering fundamentals (and materials)
- Base layer: moisture‑wicking (merino or synthetic). Avoid cotton.
- Mid layer: insulating (fleece, synthetic puffy or light down).
- Outer layer: waterproof/breathable shell (Gore‑Tex or equivalent) for wind and wet snow.
- Insulating outer: a thick down parka or puffy for campsite warmth (not for active hiking unless needed).
- Extremities
- Two glove systems: thin liner for dexterity + insulated waterproof mittens for warmth.
- Warm hat + balaclava or neck gaiter; spare dry hat in pack.
- Socks: wool or synthetic; carry at least one spare pair and a way to dry them (in vest or sleeping bag).
- Boots: insulated winter boots for camp; lighter hikers for approach. Consider gaiters for deep snow.
- Dressing tips
- Ventilate early: avoid sweating during approach—stop to unzip/remove layers before you overheat.
- Rotate and dry clothing inside your sleeping bag if damp to prevent hypothermia risk.
Cooking & Water (stoves, fuel, melting)
- Stove choice
- Liquid fuel (white‑gas, multi‑fuel): reliable in subzero temps and for long melt sessions.
- Canister stoves: convenient but can lose pressure/efficiency in very cold temperatures (use inverted canister stoves or keep canister warm).
- Small lightweight canister or alcohol stoves are possible for short melt needs, but plan fuel carefully.
- Fuel planning
- Estimate water needs (melted snow needs ~3x heat/time vs liquid water). Bring extra fuel margin (25–50%).
- Keep fuel and spare canisters insulated and near your body until use.
- Snow melting tips
- Bring a small amount of liquid water to start your stove and melt snow more efficiently.
- Use a wide pot for faster melt; pre‑crush snow to speed it up.
- Melt inside a vestibule or a wind‑protected space, not inside tent interior.
- Stealth considerations
- Avoid cooking pungent foods that produce strong odors near your site; cool your stove and store food sealed and away from sleeping area.
- Cook a short distance from tent (downwind if possible) and pack out
Prepare for Emergencies
Being discreet in winter doesn’t mean you should be unprepared. Emergencies in cold environments escalate fast; the goal is to prevent them, detect them early, and have reliable ways to get help or self‑rescue. Below is a practical, field‑tested expansion of the three short items you quoted.
Communications & Power — what to carry and how to manage it
- Phone
- Carry a fully charged smartphone with offline topo/satellite maps (e.g., Gaia/CalTopo/OSM) and emergency contacts preloaded.
- Put it in an insulated dry pocket against your body to preserve battery life in cold.
- Power bank
- Bring at least one high‑capacity power bank (20,000 mAh is a good baseline). Cold reduces effective capacity—keep it warm inside your jacket.
- Consider a second small backup (5,000–10,000 mAh) and rotate them near your torso.
- Dedicated satellite communicator / PLB / satellite phone
- For true backcountry or urban stealth where cell coverage may be absent, carry a satellite messenger (two‑way like Garmin inReach or one‑way SOS PLB).
- PLBs send a dedicated SOS to search and rescue—register it ahead of time. Two‑way messengers allow text check‑ins and can avoid unnecessary rescues.
- Balance stealth: keep these devices concealed but accessible; only activate in real emergencies.
- GPS & navigation backup
- Handheld GPS (Garmin, etc.) or smartphone with external battery + offline maps. Bring a paper topo map and compass as fail-safe.
- Practice using GPS and compass before the trip.
- Redundancy & power management
- Turn devices off when not needed. Use airplane mode, reduce screen brightness, and use scheduled check‑ins rather than constant messaging.
- Water‑ and cold‑proof cases help; a small dry bag is useful.
Trip plan & check‑in protocol — reduce response time if things go wrong
- Leave a written plan with a trusted person:
- General route, primary and alternate campsite locations (grid or map links), expected departure and return times, vehicle location, and make/model/plate.
- Check‑in schedule:
- Agree specific check‑in times (e.g., “I’ll text at 20:00 on Day 1 and 09:00 on Day 2”) and what constitutes “no check‑in” (how long before they escalate).
- Emergency escalation instructions:
- Tell them which authority to contact (local SAR, ranger station, county dispatch) and the approximate coordinates or nearest road.
- Pre‑register permits or notify land managers if required—this speeds up official responses and keeps you legal.
First aid & medical essentials — contents and cold‑specific care
- Core first aid kit (compact, field kit):
- Trauma dressings, gauze, adhesive tape, SAM splint or improvise, elastic bandage, antiseptic wipes, suturing/steri‑strips optional, scissors, tweezers.
- Medications: personal prescriptions, analgesics (ibuprofen/acetaminophen), antihistamine, anti‑diarrheal.
- Cold‑specific items:
- Chemical warming packs, small hand/foot warmers, blister kit, foil emergency blanket, lightweight bivy or emergency shelter.
- Extra dry socks, spare hat, insulated gloves—kept sealed and dry.
- Frostbite and hypothermia protocols (quick reference inside kit):
- Hypothermia (shivering, confusion, slurred speech): move to shelter, remove wet clothing, insulate with dry layers and warm fluids (non‑alcoholic), use heat packs on torso, seek evacuation if severe. Avoid rapid rewarming if rescue may be delayed and refreeze is possible—stabilize and evacuate.
- Frostbite (white/gray skin, numbness): protect from further cold, do not rub, keep limb immobilized and protected, rewarm in warm (not hot) water if immediate medical access is available; otherwise protect and evacuate.
- Training:
- Take a wilderness first aid course that covers cold injuries and prolonged care.
Survival skills & tools — for self‑rescue and delay
- Firecraft
- Carry a reliable stove (white‑gas or canister with adapter) plus lighter, ferro rod, and waterproof tinder. Know how to melt snow safely and create a wind‑protected cooking area.
- Emergency shelter & insulation
- Ultralight bivy or emergency bivy, space blanket, and an extra insulating layer or puffy. A folded closed‑cell foam pad can be a life‑saver.
- Signaling tools
- Whistle (three short blasts standard), signal mirror, bright high‑visibility tarp or bivy for daytime; a small waterproof flashlight/headlamp and red strobe for night. Use concealed until needed.
- Tools & repair kit
- Multi‑tool, duct tape, zip ties, tent repair patches, spare cordage, extra tent stakes (snow anchors or deadman anchors).
- Snow & avalanche safety (if in avalanche terrain)
- Beacon, probe, shovel; and formal avalanche training. Know how to avoid avalanche zones and read avalanche forecasts
Don’t: Underestimate the Cold — Avoid Inadequate Insulation
Cold kills fast when combined with wind, moisture, and fatigue. This section explains why ordinary summer gear fails, how wind and moisture magnify risk, and practical choices and habits to stay warm and safe.
Why summer gear fails
- Summer clothing is designed to cool, not retain heat: thin fabrics, high breathability, and little loft mean low insulation and rapid heat loss.
- Lightweight layers can trap moisture or let convective heat escape — both accelerate heat loss in cold conditions.
- Footwear and sleeping systems designed for mild weather often have low R‑values or poor water resistance, so they become liabilities once temperatures drop or snow enters.
Understand wind chill and convective heat loss
- Wind chill isn’t a new lower air temperature — it’s the increased rate at which your body loses heat when wind removes warm air from your clothing surface.
- Small wind-driven gaps, wet clothing, or exposed skin dramatically increase convective losses. A calm −5°F can feel like −30°F in high winds.
- Practical response: reduce wind exposure (shelter placement, windbreaks), seal layers against drafts, and prioritize a windproof outer shell.
Core principles: insulation, moisture management, and layering
- Insulation traps warm air; the thicker and loftier (with dry air) the layer, the better it performs.
- Moisture kills insulation: wet down/compresses loft and reduces thermal performance of synthetic fill.
- Layering strategy (purposeful):
- Base layer: moisture-wicking (merino or synthetics) to move sweat away from skin.
- Mid layers: insulating (fleece, synthetic puffy, or down) to trap heat.
- Shell layer: windproof and waterproof/breathable outer to block wind and precipitation.
- Active vs camp layers: carry a lightweight, highly breathable setup for travel and an insulated puffy/parkas for stationary camp warmth.
Materials: what to wear and why
- Avoid cotton entirely (especially next-to-skin). Cotton absorbs and holds water, losing insulation and increasing hypothermia risk.
- Merino wool: excellent next-to-skin for cold because it wicks, resists odor, and retains some insulation when damp.
- Synthetic base layers (polyester, polypropylene): faster-wicking and cheaper; retain insulation when wet better than cotton but less odor control than merino.
- Insulation fills:
- Down: best warmth-to-weight and compressibility; vulnerable to wet unless treated (hydrophobic down) or kept dry.
- Synthetic: heavier but maintains loft when wet and dries faster.
- Outer shells: choose windproof + DWR for light snow; fully waterproof membranes for wet/soggy conditions, but ensure breathability to avoid internal condensation.
Extremities: hands, feet, head — they matter most
- Head: ~30–50% of heat can be lost through an uncovered head. Use an insulating hat or balaclava; carry a spare dry beanie.
- Hands: use a two-glove system — thin liner for dexterity and insulated, waterproof outer mittens for warmth. Keep spare liners dry and in a warm pocket.
- Feet: insulated, waterproof boots for camp; lighter boots for approach if needed. Use wool/synthetic socks and bring spare pairs. Never wear damp socks to bed.
- Prevent frostbite by keeping extremities dry, insulated, and mobile (avoid constrictive footwear or tight gloves that impede circulation).
Sleeping system: avoid ground and contact heat loss
- Ground conduction is a major heat loss pathway: use high‑R sleeping pads (combined closed‑cell foam + insulated inflatable is best).
- Insulate sleeping bag from ground with an R‑value appropriate to temps: R4–R7 depending on ground and ambient cold.
- Use a sleeping bag liner to add warmth and keep the bag dry; stash damp clothing outside the bag but in a dry bag near your torso if you must (to dry via body heat).
Manage sweat and moisture proactively
- Prevent sweating on approaches by regulating pace and venting layers early.
- Change into dry base layers and socks before stopping for long periods or taking shelter for the night.
- Dry wet items intelligently: in your sleeping bag near your torso for short periods, or on a line in a vestibule out of wind (watch condensation).
- Store spare clothes in a dry bag; keep critical dry items (spare socks, hat) in a warm pocket if possible.
Emergency warming techniques and tools
- Chemical hand/foot warmers for short-term localized heat.
- Hot water bottle: fill a robust leakproof bottle with hot water and place in sleeping bag for extra warmth (wrap in cloth to avoid burns).
- Reflective bivy or space blanket can retain radiant heat in emergencies but are not long‑term comfort solutions.
- Never rely on open fires as primary warmth (risk, legality, and trace); stoves for melting and limited warming are preferable.
Nutrition, hydration, and circulation
- Eat calorie-dense foods regularly — digestion produces internal heat. Include fats, carbs, and warm liquids.
- Stay hydrated: dehydration reduces circulation and cold tolerance. Melt snow safely and drink warm fluids often.
- Avoid alcohol before sleep — it causes vasodilation, increased heat loss, and impairs shivering response. Caffeine is a diuretic in large doses, so balance intake.
Recognize and respond to hypothermia and frostbite early
- Hypothermia signs:
- Mild: shivering, cold extremities, fatigue.
- Moderate: intense shivering, confusion, slurred speech, slowed breathing.
- Severe: loss of shivering, difficulty walking, unconsciousness — emergency evacuation.
- Frostbite signs:
- Early: numbness, pins-and-needles, pale/firm skin.
- Later: white/gray or waxy skin, hard tissue — do not rub; protect and rewarm only if rescue/medical care is imminently available.
- Immediate steps:
- Get out of wind and wet conditions.
- Replace wet clothing with dry layers, insulate head and torso first.
Don’t Ignore Weather Forecasts
Why Weather Forecasts Matter in Winter Stealth Camping
Winter weather can change rapidly and unpredictably, turning a routine stealth camp into a dangerous situation. Unlike summer, where a sudden rainstorm is mostly an inconvenience, winter storms can bring life-threatening cold, whiteout conditions, deep snow, freezing rain, or high winds. These factors can quickly overwhelm even experienced campers and make stealthy retreat or rescue difficult.
How to Read and Use Weather Forecasts
- Check Multiple Sources: Use national meteorological services (e.g., NOAA, Environment Canada, Met Office) and specialized mountain or backcountry forecasts (like Mountain-Forecast.com or local avalanche centers). Compare predictions for temperature, wind, precipitation, and storm warnings.
- Look for Key Details:
- Temperature: Note both daytime highs and overnight lows. Extreme cold (below your gear’s rating) is a red flag.
- Wind: High winds increase the risk of frostbite and hypothermia, and can collapse tents or make fires impossible.
- Precipitation: Heavy snow, sleet, or freezing rain can bury gear, block exits, and make navigation hazardous.
- Storm Warnings: Pay attention to advisories for blizzards, ice storms, or avalanche conditions.
- Monitor Trends: A dropping barometer, increasing cloud cover, or sudden wind shifts can signal an approaching front even before it’s forecasted.
Setting Personal Thresholds
- Know Your Limits: Decide in advance what conditions are a “no-go.” For example:
- If wind chills are forecast below −20°C (−4°F), or if more than 15 cm (6 in) of snow is expected overnight, postpone your trip.
- If avalanche danger is rated moderate or higher in your area, avoid exposed slopes or cancel.
- Gear Limitations: Never plan to “tough it out” if your sleeping bag, clothing, or shelter aren’t rated for the coldest expected temperatures.
Field Monitoring and Flexibility
- Check Forecasts Before and During Your Trip: Download updated forecasts before losing cell service. If you have a satellite communicator, use it to get weather updates in the field.
- Watch for Warning Signs: Sudden temperature drops, rising winds, or thickening clouds mean you should prepare to move or hunker down.
- Have an Exit Plan: Always know your quickest route out and have a backup shelter location in case your primary site becomes unsafe.
When to Abort or Change Plans
- Don’t Wait Until It’s Too Late: If the weather deteriorates—winds pick up, snow intensifies, or temperatures drop unexpectedly—pack up and leave before conditions become unmanageable.
- Safety Over Stealth: If you must choose between staying hidden and staying safe, always prioritize safety. Move to a more sheltered or accessible location if needed, even if it means being more visible.
Practical Tips
- Build in Buffer Time: Allow extra time in your schedule for weather delays or early exits.
- Bring Extra Supplies: Carry more food, fuel, and warm clothing than you think you’ll need in case you’re forced to wait out a storm.
- Communicate: Let your check-in contact know you may change plans if the weather turns, and update them if you do.
Ignoring winter weather forecasts is one of the most common—and dangerous—mistakes in stealth camping. By making weather awareness a core part of your planning and remaining flexible in the field, you’ll greatly reduce your risk and ensure your adventure remains safe, enjoyable, and stealthy.
Do: Practice Discretion — Arrive Late, Leave Early
Stealth camping is all about minimizing your presence and avoiding detection. In winter, when landscapes are quieter and tracks are more visible, discretion becomes even more critical. Here’s how to maximize your stealth by timing your arrival and departure, and by managing your behavior at camp.
Why Timing Matters
- Reduced Human Activity: Most people are indoors during dusk, night, and early morning, especially in winter. Arriving late and leaving early means fewer hikers, rangers, or locals are likely to spot you.
- Natural Cover: Low light at dusk and dawn helps conceal your movements and setup, making it harder for others to notice you from a distance.
- Fresh Tracks: Snow preserves footprints and gear marks. Arriving late and leaving early reduces the window for others to follow your tracks or notice disturbances.
Best Practices for Stealthy Arrival
- Scout in Advance: If possible, visit the general area in daylight to identify approach routes, obstacles, and the best micro-sites. Mark GPS waypoints or take mental notes.
- Approach Quietly: Walk slowly, avoid breaking branches, and keep conversation to a minimum. If you use trekking poles, remove or muffle the tips.
- Use Natural Cover: Move along tree lines, behind boulders, or through depressions to stay out of sight from trails, roads, or buildings.
- Arrive at Dusk: Plan your hike so you reach your chosen site just as daylight fades. This gives you enough light to set up safely but not enough for others to spot you easily.
Best Practices for Stealthy Departure
- Pack Up at First Light: Set an alarm for pre-dawn or first light. Pack quietly and efficiently, minimizing time spent at the site.
- Leave No Trace: Brush out footprints, scatter snow over disturbed areas, and ensure no gear or trash is left behind.
- Exit Quietly: Retrace your approach route if it’s still the most concealed, or use a different path if you notice new activity nearby.
Managing Light and Sound
- Avoid Bright Lights: Use a headlamp with a red or dimmed setting. Shield your light with your hand or body when necessary. Never use lanterns or high-powered flashlights that can be seen from afar.
- No Fires: Fires are visible and leave evidence. Use a small stove for cooking, and shield it from view.
- Keep Noise Down: Whisper if you must speak. Avoid playing music, using loud zippers, or banging pots. Silence is your ally.
Additional Tips
- Prepare Gear in Advance: Organize your pack so you can set up and break down camp quickly and quietly, even in low light.
- Dress in Muted Colors: Earth tones and dark clothing blend in with winter landscapes and reduce your silhouette.
- Monitor Surroundings: Pause and listen before moving or making noise. If you hear voices or vehicles, wait until they pass.
Arriving late and leaving early is a cornerstone of stealth camping. By timing your movements to coincide with low human activity, using natural cover, and minimizing light and sound, you greatly reduce your chances of being detected. In winter, these habits are even more important, as snow can betray your presence and cold conditions make quick, efficient camp routines essential. Practicing discretion ensures your winter stealth camping experience remains safe, undisturbed, and truly off the grid.
Blend In
Blending in is a core principle of stealth camping, especially in winter when the landscape is stark, sound travels farther, and human presence is more noticeable. Effective concealment relies on both your gear choices and your use of the environment. Here’s how to maximize your invisibility:
Gear Selection for Stealth
- Earth-Toned and Muted Colors:
- Choose tents, tarps, bivies, and backpacks in shades of brown, green, gray, or white (if snow is present). Avoid bright colors, neon accents, or large logos.
- If your gear is brightly colored, use camouflage netting, a drab poncho, or even a simple brown/green sheet to cover it.
- Non-Reflective Materials:
- Avoid shiny fabrics, metallic zippers, reflective guy lines, or glossy coatings. These can catch headlights, moonlight, or flashlights from a distance.
- Cover reflective patches with tape or marker, and choose matte-finish cookware and water bottles.
- Low-Profile Shelter:
- Select tents or bivies with a low silhouette that hug the ground and are less likely to catch the eye.
- Avoid tall or oddly shaped shelters that stand out against the horizon or tree line.
Using Natural Cover
- Trees and Bushes:
- Set up camp under dense evergreen branches, behind thickets, or in the lee of fallen logs. These natural barriers break up your outline and shield you from view.
- Avoid open meadows, ridgelines, or areas near popular trails where you’re easily spotted.
- Snowbanks and Terrain Features:
- In deep snow, dig a shallow trench or use existing snowbanks to shield your shelter from sightlines.
- Use depressions, small hollows, or the base of a slope to further reduce visibility.
- Blending Tracks:
- After setting up, brush out or fill in your approach tracks with a branch or your boot to erase obvious signs of passage.
- Avoid making a straight line from trail to camp; zigzag or use animal tracks to mask your route.
Additional Stealth Tips
- Minimize Movement:
- Once set up, limit movement outside your shelter, especially during daylight or when others might be nearby.
- Sound Discipline:
- Keep voices low, avoid clattering gear, and silence electronic devices.
- Light Management:
- Use red or dimmed headlamps, and always shield light sources with your hand or body. Never let light shine directly onto open snow or through tent walls.
- Odor Control:
- Store food in odor-proof bags and cook away from your sleeping area to avoid attracting attention from animals or people.
Why Blending In Matters
- Avoiding Detection:
- Hunters, rangers, and other campers are more likely to notice out-of-place colors or shapes, especially in winter’s monochrome environment.
- Respect for Wildlife:
- Blending in reduces disturbance to animals, which are already stressed in winter.
- Legal and Ethical Considerations:
- In areas where stealth camping is discouraged or prohibited, blending in minimizes the risk of confrontation and helps preserve access for responsible campers.
Blending in is about more than just color—it’s about minimizing every aspect of your presence. By choosing muted, non-reflective gear and making smart use of natural cover, you can camp discreetly and respectfully, leaving no trace of your adventure behind. In winter, when the environment is unforgiving and privacy is precious, these habits are essential for a successful stealth camping experience.
Don’t: Leave a Trace — Respect the Environment
Stealth camping is not just about avoiding people—it’s about minimizing your impact on the land so that your presence is invisible to both humans and nature. In winter, the environment is especially fragile, and careless actions can have lasting effects. Here’s how to practice true Leave No Trace ethics in winter stealth camping:
Don’t Cut Live Branches or Damage Vegetation
- Why It Matters:
- Trees and shrubs are already stressed in winter due to cold, snow load, and limited resources. Cutting live branches for cover or firewood can kill or permanently damage them.
- Damaged vegetation is highly visible in the snow and will be obvious to rangers or landowners, increasing the risk of detection and harming the ecosystem.
- Best Practices:
- Use only dead and downed wood if you must gather sticks (for snow anchors or emergency fire), and do so sparingly.
- Never break branches off living trees for shelter, camouflage, or fire.
- Avoid trampling sensitive plants or digging into moss, lichen, or fragile ground cover, even if it’s under snow.
- Set up camp on durable surfaces—packed snow, bare ground, or established clearings—rather than on top of shrubs or young trees.
Avoid Making Fires Unless Absolutely Necessary and Permitted
- Why It Matters:
- Fires leave lasting scars: burned patches, charred wood, and blackened rocks are visible for months or years, especially in snow.
- Gathering firewood in winter is difficult and often means stripping standing deadwood, which provides critical habitat for wildlife.
- Smoke and light from fires are visible from a distance, defeating the purpose of stealth camping.
- Best Practices:
- Use a small, efficient backpacking stove for cooking and melting snow. Modern stoves are reliable in cold and leave no trace.
- If you must make a fire (for emergency warmth or survival), use only dead and downed wood, build it on snow or mineral soil, and keep it small.
- Dismantle any fire ring, scatter ashes, and cover the site with snow or natural debris before leaving.
- Always check local regulations—many areas prohibit fires in winter or during certain seasons to protect the environment.
Additional Leave No Trace Tips for Winter
- Minimize Site Disturbance:
- Avoid digging large snow caves or trenches unless necessary for safety. Fill in any holes or depressions before leaving.
- Brush out or fill in tracks and disturbed snow to make your presence less obvious.
- Respect Wildlife:
- Winter is a critical time for animals. Avoid camping near known dens, nests, or wildlife trails.
- Store food securely and never leave scraps that could attract animals or alter their natural behavior.
- Pack Out All Waste:
- Carry out all trash, leftover food, and used fuel canisters.
- For human waste, use a portable toilet bag or dig a deep cathole at least 200 feet from water sources, then cover and disguise it thoroughly.
Respecting the environment is fundamental to stealth camping. By avoiding damage to vegetation, minimizing fire use, and practicing strict Leave No Trace principles, you ensure that your winter adventure leaves the landscape exactly as you found it—pristine, wild, and welcoming for the next visitor (human or animal). This not only protects fragile winter ecosystems but also preserves the spirit and privilege of stealth camping for the future.
Pack Out Everything
Packing out everything you bring is a core principle of Leave No Trace, and it’s even more crucial in winter stealth camping, where evidence of your presence can linger for months. Here’s how to ensure you leave your site as pristine as you found it:
Leave No Trash
- All Waste, All the Time:
- Carry out every bit of trash, including food wrappers, packaging, used tissues, and even micro-trash like twist ties or tea bag tags.
- Use a dedicated trash bag or odor-proof sack to contain all garbage until you reach a proper disposal site.
- Plan for Waste:
- Repackage food at home to minimize packaging and reduce what you need to carry out.
- Bring extra ziplocks or dry bags for unexpected waste or wet trash.
Food Scraps and Cooking Waste
- No Food Left Behind:
- Never bury or scatter food scraps, even biodegradable ones. In winter, decomposition is slow or nonexistent, and animals will dig up anything edible.
- Strain dishwater through a fine mesh and pack out the food particles; scatter the graywater well away from camp and water sources.
- Odor Control:
- Store all food waste in sealed bags to avoid attracting wildlife.
- Clean up thoroughly after meals, checking for dropped crumbs or spilled liquids.
Gear and Micro-Trash
- Double-Check Your Site:
- Before leaving, sweep the area for forgotten tent stakes, cord, bottle caps, or other small items.
- Use a headlamp to scan the snow or ground for overlooked gear, especially in low light.
- Lost-and-Found Mindset:
- If you find trash left by others, pack it out too. This helps maintain the area’s wild character and goodwill toward stealth campers.
Human and Pet Waste
- Pack Out or Bury Properly:
- In sensitive or high-use areas, use a portable toilet bag (WAG bag, Restop, etc.) and pack out all human waste.
- If burying is permitted, dig a deep cathole (6–8 inches/15–20 cm) at least 200 feet (60 m) from water, trails, and camp, and disguise it thoroughly.
- Pack out used toilet paper and hygiene products in a sealed bag.
- Pet Waste:
- If camping with a dog, pack out pet waste as well.
Restore the Site
- Erase Your Presence:
- Fill in any snow trenches, holes, or depressions you created.
- Brush out footprints and gear marks with a branch or your boot.
- Scatter natural materials (snow, leaves, twigs) to blend the site with its surroundings.
- Naturalize the Area:
- If you moved rocks or logs, return them to their original positions.
- Avoid leaving any unnatural patterns or disturbances that could draw attention.
Why It Matters
- Wildlife Protection:
- Trash and food scraps can harm animals, alter their behavior, and attract them to human areas.
- Preserving Stealth:
- Evidence of camping (trash, disturbed snow, gear marks) can lead to increased enforcement or restrictions.
- Ethical Stewardship:
- Leaving no trace ensures that the wilderness remains unspoiled for future visitors and maintains the privilege of stealth camping.
Packing out everything is non-negotiable for responsible winter stealth camping. By removing all waste, restoring the site, and leaving no evidence of your stay, you protect the environment, respect wildlife, and help ensure that wild places remain open and beautiful for everyone.
Do: Stay Safe and Healthy — Hydrate and Eat Well
Proper hydration and nutrition are critical for winter stealth camping. Cold weather increases your body’s energy demands and can mask thirst, while the process of melting snow and preparing food in stealth conditions requires planning and discipline. Here’s how to manage water and food for safety, comfort, and stealth:
Hydration: Melt Snow Safely and Efficiently
- Why Hydration Matters in Winter:
- Cold air is dry, and you lose water through respiration (breathing out vapor) and increased urination (cold diuresis).
- Dehydration impairs circulation, increases the risk of frostbite and hypothermia, and reduces mental clarity.
- Melting Snow for Water:
- Always use clean, white snow—avoid yellow, gray, or snow near roads/trails.
- Start with a small amount of liquid water in your pot to prevent scorching and speed up melting.
- Use a wide, lidded pot for efficiency; crush snow to pack more in and reduce air gaps.
- Plan for extra fuel: melting snow requires 3–4 times more fuel than boiling liquid water.
- Water Treatment:
- Boil snowmelt for at least 1 minute (longer at altitude) to kill pathogens.
- If boiling isn’t possible, use a filter or chemical treatment (iodine, chlorine dioxide), but note that some filters can freeze and chemicals work slowly in cold water.
- Store water bottles upside down in your pack or sleeping bag to prevent freezing at the mouth.
- Stealth Tips:
- Melt water away from your sleeping area to avoid attracting animals.
- Use a stove shield to minimize light and odor.
Nutrition: High-Calorie, Easy-to-Prepare Foods
- Why Calories Matter:
- Your body burns more calories in cold weather to maintain core temperature—often 3,000–5,000 kcal/day or more.
- Digestion itself generates heat (“thermogenesis”), helping you stay warm at night.
- Food Selection:
- Choose calorie-dense foods: nuts, cheese, nut butters, chocolate, energy bars, instant noodles, freeze-dried meals, and olive oil.
- Favor foods that require minimal prep and can be eaten cold if necessary (in case your stove fails).
- Include a mix of fats (long-lasting energy), carbs (quick energy), and protein (muscle repair).
- Meal Planning:
- Pre-portion meals at home to reduce trash and simplify cooking.
- Plan for hot drinks (tea, cocoa, soup) to boost morale and hydration.
- Bring snacks for quick energy on the move—eat small amounts regularly rather than large meals.
- Cooking in Stealth:
- Use a small, efficient stove; avoid foods with strong odors or that require long simmering.
- Cook away from your sleeping area and pack out all food scraps.
- Avoid open flames or visible light—use a windscreen and cook in a sheltered spot.
Practical Tips
- Monitor Intake:
- Don’t wait until you’re thirsty—sip water regularly, even if you don’t feel like it.
- Eat before bed to fuel overnight warmth.
- Prevent Freezing:
- Keep water bottles and snacks inside your sleeping bag or close to your body.
- Use insulated containers or bottle covers.
- Emergency Rations:
- Carry extra food and fuel in case you’re delayed by weather or injury.
Staying hydrated and well-fed is essential for winter stealth camping. By planning your water and food systems for cold, stealthy conditions, you’ll maintain energy, stay warm, and reduce your risk of cold-related illness or accidents. Smart hydration and nutrition are as important as your shelter or sleeping bag—never neglect them in your winter camping routine.
Monitor Your Body
Winter stealth camping demands constant self-awareness because cold injuries can develop quickly and escalate into life-threatening emergencies. Monitoring your body is not just about comfort—it’s about survival and the ability to make sound decisions. Here’s how to stay vigilant and proactive:
Recognize Early Signs of Hypothermia
- Mild Hypothermia:
- Shivering, cold extremities, numb fingers or toes, mild confusion, fatigue, and clumsiness.
- Action: Add layers, eat high-energy food, drink warm fluids, and get out of the wind.
- Moderate Hypothermia:
- Intense, uncontrollable shivering, slurred speech, loss of coordination, slow or irrational thinking, stumbling.
- Action: Immediately seek shelter, remove wet clothing, insulate with dry layers, use chemical warmers on the torso, and drink warm (non-alcoholic) fluids if alert.
- Severe Hypothermia:
- Shivering stops, skin is cold and pale, inability to walk, confusion or unconsciousness, slow or irregular heartbeat.
- Action: This is a medical emergency—insulate the person, prevent further heat loss, and seek rescue. Do not attempt rapid rewarming if evacuation will be delayed.
Recognize Early Signs of Frostbite
- Frostnip (early stage):
- Tingling, numbness, or pale/white patches on fingers, toes, nose, or ears.
- Action: Warm the area gently with body heat (e.g., place fingers in armpits), avoid rubbing, and add insulation.
- Superficial Frostbite:
- Skin turns white, gray, or waxy; feels hard but underlying tissue is soft.
- Action: Protect from further cold, rewarm only if you can keep the area warm (do not allow to refreeze), and seek medical help.
- Deep Frostbite:
- Skin is hard, blue/black, and numb; tissue may blister after rewarming.
- Action: Immobilize, protect, and evacuate as soon as possible. Do not rewarm if there’s a risk of refreezing before evacuation.
Keep Extremities Dry and Warm
- Hands:
- Use a two-glove system: thin liner for dexterity, insulated waterproof mittens for warmth.
- Change gloves if damp; keep spares in a dry, warm pocket.
- Feet:
- Wear wool or synthetic socks; avoid cotton.
- Change into dry socks before bed and after heavy exertion.
- Use insulated, waterproof boots and gaiters in deep snow.
- Head and Face:
- Wear a warm hat, balaclava, or neck gaiter. Carry a spare dry hat.
- Use a face mask or scarf in high wind or extreme cold.
Proactive Habits
- Check Yourself and Partners Regularly:
- Do a “buddy check” for pale skin, clumsy movements, or confusion.
- Ask simple questions to assess mental clarity.
- Manage Moisture:
- Ventilate layers to prevent sweat buildup.
- Dry damp clothing in your sleeping bag or near your body if safe.
- Stay Fueled and Hydrated:
- Eat and drink regularly to maintain energy and circulation.
- Rest and Shelter:
- Take breaks in sheltered spots out of the wind.
- Avoid sitting directly on snow or cold ground—use a foam pad.
Emergency Response
- If You Suspect Hypothermia or Frostbite:
- Stop, seek shelter, and address the problem immediately.
- Remove wet clothing, add insulation, and use chemical warmers on the torso (not directly on skin).
- For frostbite, do not rub or massage the area; protect and immobilize.
- If severe symptoms develop, activate your emergency plan and seek rescue.
Vigilant self-monitoring is your best defense against cold injuries. By checking for early warning signs, keeping extremities dry and warm, and acting quickly at the first hint of trouble, you can prevent minor issues from becoming emergencies. Make body checks a routine part of your winter stealth camping experience—your safety depends on it.
Don’t: Take Unnecessary Risks — Avoid Trespassing
Stealth camping is about discretion and respect—not just for your own safety, but for the rights and boundaries of others. Trespassing can lead to legal trouble, dangerous confrontations, and a negative reputation for all campers. Here’s how to avoid trespassing and why it matters:
Understand Land Ownership and Access
- Know Where You Are:
- Use detailed maps, GPS apps (like OnX, Gaia GPS, or local GIS/parcel viewers), and posted signs to determine land ownership.
- Public lands (national/state/provincial forests, BLM, crown land) often allow dispersed camping, but always check for seasonal or area-specific restrictions.
- Private land is off-limits unless you have explicit, advance permission from the owner.
- Restricted Zones:
- Some public lands have areas closed for wildlife protection, restoration, or safety (e.g., avalanche zones, military land, utility corridors).
- Parks, preserves, and reserves may have “no camping” zones, especially near trailheads, water sources, or sensitive habitats.
Legal and Ethical Consequences
- Legal Risks:
- Trespassing is a criminal or civil offense in many regions. You could face fines, arrest, or confiscation of gear.
- In some areas, landowners are legally protected if they use force to remove trespassers—never risk a confrontation.
- Ethical Considerations:
- Trespassing damages the reputation of all campers and can lead to stricter regulations or loss of access for everyone.
- Respect for property rights is fundamental to responsible outdoor recreation.
How to Avoid Trespassing
- Plan Ahead:
- Research your intended area thoroughly before your trip. Use multiple sources to confirm boundaries.
- If in doubt, choose a different location or contact the landowner for permission.
- Observe Signs and Fences:
- Never cross fences, gates, or barriers marked with “No Trespassing,” “Private Property,” or similar warnings.
- Respect local customs—some areas may have unwritten rules about access; ask locals or rangers if unsure.
- Stay on Legal Trails and Access Points:
- Use established public access points for entry and exit.
- Avoid shortcutting across private land, even if it seems unoccupied.
What to Do If Approached
- Be Polite and Honest:
- If a landowner or ranger approaches, explain your situation calmly and respectfully.
- Apologize and leave immediately if asked.
- Avoid Confrontation:
- Never argue, threaten, or try to hide your presence if discovered.
- If you feel unsafe, leave the area as quickly and quietly as possible.
Why It Matters
- Safety:
- Trespassing can put you at risk of dangerous encounters with landowners, livestock, or law enforcement.
- Preserving Access:
- Responsible behavior helps keep wild places open for future stealth campers and outdoor enthusiasts.
- Community Reputation:
- Positive relationships with landowners and local communities foster goodwill and may lead to more access opportunities.
Avoiding trespassing is a cornerstone of ethical stealth camping. By respecting property boundaries, seeking permission when needed, and choosing legal sites, you protect yourself, the environment, and the future of stealth camping for everyone.
Don’t Push Your Limits
Winter stealth camping is inherently risky, and the margin for error is much smaller than in milder seasons. Recognizing your physical, mental, and environmental limits—and acting on them—is essential for survival and long-term enjoyment of the outdoors. Here’s how to approach your limits with humility and practical wisdom:
Recognize Warning Signs Early
- Physical Red Flags:
- Persistent shivering, numbness, loss of dexterity, or uncontrollable fatigue.
- Dizziness, confusion, slurred speech, or difficulty walking—these are signs of hypothermia or severe cold stress.
- Unusual pain, shortness of breath, or chest discomfort.
- Mental Red Flags:
- Difficulty making decisions, irritability, or apathy.
- Feeling “too tired to care” about basic tasks like eating, drinking, or layering up.
- Environmental Red Flags:
- Sudden weather changes: dropping temperatures, rising winds, heavy snow, or whiteout conditions.
- Unexpected obstacles: impassable terrain, deep snow, or blocked exit routes.
Take Decisive Action
- Move to Safety Promptly:
- If you feel unsafe, cold, or unwell, don’t wait for things to get worse. Move to a more sheltered location, set up emergency shelter, or begin your exit plan.
- If you’re with a group, communicate your condition honestly—don’t try to “tough it out” in silence.
- Seek Help When Needed:
- Use your phone, satellite communicator, or whistle to call for help if you’re unable to self-rescue.
- Don’t hesitate to activate your emergency plan if you’re lost, injured, or showing signs of severe cold injury.
Avoid the Trap of Pride
- Don’t Let Ego Override Judgment:
- It’s easy to feel pressure to “finish what you started,” especially if you’ve invested time and effort in planning.
- Remember: the wilderness doesn’t care about your pride. Survival and safety always come first.
- Learn from Experience:
- Every winter trip is a learning opportunity. If you have to bail out early, treat it as valuable feedback for future adventures—not as failure.
- Share your experiences with others to help build a culture of safety and humility in the outdoor community.
Build in Safety Margins
- Plan for the Unexpected:
- Always have extra food, fuel, and warm clothing in case you’re delayed or forced to wait out a storm.
- Know your exit routes and have a backup plan for every trip.
- Set Personal Thresholds:
- Decide in advance what conditions or symptoms will trigger your decision to leave or seek help.
- Stick to these thresholds, even if it means cutting your trip short.
Why This Matters
- Winter Conditions Escalate Quickly:
- What starts as mild discomfort can become life-threatening in minutes if you ignore the signs.
- Self-Rescue is Harder in Winter:
- Deep snow, darkness, and cold sap your energy and make movement slow and dangerous.
- Your Decisions Affect Others:
- Delaying action can put rescuers or companions at risk, too.
The most experienced winter campers are not those who never turn back, but those who know when to do so. By respecting your limits, acting early, and prioritizing safety over pride, you ensure that every winter stealth camping trip is a story of adventure—not a cautionary tale.
Conclusion — The Deeper Rewards and Responsibilities of Winter Stealth Camping
Winter stealth camping is more than just a test of survival skills—it’s an invitation to experience wild places in their most silent, pristine, and challenging state. The rewards are profound: the hush of falling snow, the glow of dawn on untouched drifts, the satisfaction of self-reliance, and the thrill of moving unseen through a world transformed by winter.
But these rewards come with responsibilities. The dos and don’ts outlined above aren’t just rules—they’re the foundation for a safe, ethical, and fulfilling experience. Let’s explore why these principles matter and how they shape your journey:
The Rewards
- Solitude and Peace:
- Winter’s quiet amplifies the sense of solitude. You’ll find a deeper connection to nature, free from crowds and distractions.
- Adventure and Growth:
- Every winter stealth camp is a personal challenge. Navigating snow, cold, and darkness builds resilience, adaptability, and confidence.
- Accomplishment:
- Successfully planning, executing, and leaving no trace in a winter environment is a genuine achievement—one that stays with you long after you leave the woods.
- Unique Beauty:
- The winter landscape offers sights and sounds unavailable in any other season: animal tracks in fresh snow, the sparkle of frost, the clarity of starlit nights.
The Responsibilities
- Preparation:
- Winter magnifies every mistake. Thorough planning—gear, location, weather, and emergency protocols—is not optional; it’s essential.
- Respect:
- Respect for the land, wildlife, and local communities ensures that your presence is invisible and your impact is minimal. This respect preserves access for future campers and protects fragile ecosystems.
- Discretion:
- Stealth is not just about avoiding people; it’s about blending into the rhythms of the wild, moving quietly, and leaving no evidence of your stay.
- Adaptability:
- Conditions change fast. The best winter campers are those who know when to turn back, when to seek shelter, and when to ask for help.
The Lasting Impact
By following these principles, you become part of a tradition of responsible, ethical outdoor adventure. You help keep wild places wild, maintain good relationships with landowners and local communities, and set an example for others who seek the same experiences.
Winter stealth camping, done right, is a celebration of both freedom and responsibility. It’s about finding adventure on your own terms—while honoring the land and all who share it.
Remember: Preparation, respect, and discretion are your best tools for a successful winter stealth camping experience. With these as your guide, you’ll not only stay safe and comfortable, but you’ll also help ensure that the privilege of winter camping remains available for generations to come.


Leave a Reply