
Dispersed camping in a dense forest offers solitude and a deep connection with nature. Hammock camping, in particular, provides comfort, minimizes environmental impact, and allows for flexible site selection. However, setting up a hammock campsite efficiently and correctly requires careful planning and knowledge of best practices.
1. Site Selection
1.1. Choosing the Right Location
Selecting the right spot for your hammock is the foundation of a safe, comfortable, and environmentally responsible campsite. In a dense forest, this process requires careful observation and consideration of several factors:
Look for Healthy Trees
- Tree Health and Stability: The trees you choose must be alive, robust, and at least 6 inches (15 cm) in diameter. Living trees are flexible and strong enough to support your weight and the dynamic forces of a hammock.
- Signs of Health: Look for trees with full, green canopies, solid bark, and no visible rot or fungus.
- Avoid Dead or Damaged Trees: Dead trees (snags) or those with large cracks, hollow sounds when tapped, or missing bark are unstable and can fall unexpectedly, especially in wind or rain.
- Tree Spacing: The ideal distance between trees is typically 12–20 feet (3.5–6 meters), depending on your hammock’s length. Too close, and your hammock will be tight and uncomfortable; too far, and your straps may not reach or will be under excessive tension.
Flat, Clear Ground
- Safety and Comfort: Even though you’re suspended, a flat area beneath your hammock is important.
- Movement: You’ll be walking, standing, and possibly cooking or organizing gear under and around your hammock. Uneven or sloped ground increases the risk of tripping or rolling an ankle.
- Emergency Egress: In the unlikely event you fall out of your hammock, landing on flat, debris-free ground is much safer than on rocks, roots, or sharp branches.
- Clearing Debris: Remove sticks, pinecones, and other sharp objects from the area beneath your hammock. This not only protects you but also minimizes your impact on the site.
Avoid Hazards
- Widowmakers: These are dead branches or trees that can fall without warning.
- Look Up: Before setting up, scan the canopy above for dead limbs, leaning trees, or branches caught in the canopy. Even a small branch can cause serious injury if it falls.
- Animal Trails:
- Wildlife Corridors: Avoid setting up on game trails or paths used by animals. These are often subtle but can be identified by worn ground, tracks, or droppings. Camping on a trail can disturb wildlife and put you at risk of an unexpected encounter.
- Flood-Prone Areas:
- Water Flow: Avoid low spots, dry creek beds, or areas near rivers and lakes that could flood during rain. Even if the weather is clear, upstream storms can cause sudden rises in water levels.
- Mosquitoes and Dampness: Low, wet areas also tend to harbor more insects and can make for a damp, uncomfortable night.
Additional Considerations
- Sun and Wind Exposure: Consider the direction of the sun and prevailing winds. In hot weather, shade is valuable; in cold weather, morning sun can help warm you up. Position your hammock so your tarp can block prevailing winds if needed.
- Privacy and Noise: In a dense forest, you may want to choose a spot away from trails or other campers for solitude and quiet.
Taking the time to carefully select your hammock site in a dense forest ensures your safety, comfort, and minimizes your impact on the environment. Always prioritize healthy trees, flat and clear ground, and avoid natural hazards for the best dispersed camping experience.
1.2. Leave No Trace Principles
Leave No Trace (LNT) is a set of outdoor ethics promoting conservation and responsible recreation. When hammock camping in a dense forest, applying these principles is crucial to preserve the ecosystem for future visitors and wildlife. Here’s a deeper look at the key points:
Camp at Least 200 Feet from Water
- Why 200 Feet? Setting up camp at least 200 feet (about 70 adult paces) from lakes, rivers, streams, and wetlands helps protect fragile riparian zones. These areas are vital for wildlife, plant diversity, and water quality.
- Preventing Pollution: Camping too close to water increases the risk of contaminating it with soap, food scraps, or human waste. Even biodegradable products can harm aquatic life.
- Wildlife Access: Animals rely on water sources for drinking and habitat. If you camp too close, you may block their access or stress them, especially at dawn and dusk when many animals visit water.
- Erosion Control: Repeated foot traffic near water can erode banks, destroy plant roots, and muddy the water, harming fish and other aquatic organisms.
Tip: If you need water for cooking or cleaning, carry it back to your campsite in a container rather than doing chores at the water’s edge.
Minimize Impact
- Use Established Sites: If a campsite or hammock spot already exists (evidenced by compacted soil, lack of vegetation, or visible use), use it rather than creating a new one. This concentrates impact in one area instead of spreading it across the forest.
- Avoid Trampling Vegetation: In dense forests, the understory (ferns, mosses, seedlings) is delicate and slow to recover from damage.
- Hammock Advantage: Hammocks naturally reduce ground impact compared to tents, but repeated foot traffic can still harm plants.
- Setup: Place your hammock and gear on durable surfaces like bare soil, rocks, or leaf litter rather than lush, green areas.
- Rotate Sites: If you return to the same forest often, vary your campsites to allow impacted areas to recover.
- Group Size: Keep groups small to reduce cumulative impact. Large groups can quickly overwhelm a site’s ability to recover.
Additional Leave No Trace Practices
- Pack Out Trash: Carry out all litter, leftover food, and even small items like twist ties or microtrash.
- Respect Wildlife: Observe animals from a distance and never feed them. Store food securely to avoid attracting wildlife.
- Minimize Campfire Impact: Use a camp stove for cooking. If fires are allowed, use established fire rings and keep fires small. Never cut live trees or branches for firewood.
- Restore the Site: Before leaving, scatter any moved sticks or leaves, and check for forgotten gear or trash.
Applying Leave No Trace principles while hammock camping in a dense forest ensures that you protect water sources, minimize your impact on fragile vegetation, and preserve the wild character of the forest. By camping at least 200 feet from water and using established or durable sites, you help maintain the health and beauty of these natural spaces for everyone.
2. Hammock Setup
2.1. Hanging the Hammock
Setting up your hammock correctly is essential for comfort, safety, and minimizing your impact on the forest. Let’s explore each aspect in detail:
Tree Straps
- Why Use Tree Straps? Tree straps are flat, wide bands (at least 1 inch/2.5 cm wide) made of strong, non-stretch material like polyester or nylon.
- Protection: Wide straps distribute the weight of the hammock over a larger area, preventing the straps from cutting into or damaging the tree’s bark and cambium layer (the living tissue just beneath the bark).
- Leave No Trace: Thin ropes can girdle trees, causing long-term damage or even death. Tree-friendly straps are a core part of responsible hammock camping.
- Proper Use:
- Wrap the strap around the tree at the desired height, making sure it lies flat and doesn’t twist.
- Avoid using nails, screws, or any hardware that penetrates the tree.
Height and Angle
- Attachment Height:
- General Rule: Attach your straps at about head height, typically 5.5–6 feet (1.7–1.8 meters) up the tree. This height allows for a comfortable hang once you account for the sag in the hammock.
- Adjust for Tree Distance: If your trees are farther apart, you may need to attach the straps a bit higher to maintain the correct hang.
- The 30-Degree Angle:
- Why 30 Degrees? The ideal angle between the strap and the ground is about 30 degrees. This angle balances comfort and safety:
- Too steep (less than 30°): The hammock will be tight, putting excessive force on the trees and your suspension system, and making the hammock uncomfortable and tippy.
- Too shallow (more than 30°): The hammock will sag too much, and you may end up too close to the ground.
- How to Estimate:
- Use your hand: Make a “gun” shape with your thumb and forefinger. Place your thumb parallel to the ground and your forefinger pointing up; the angle between them is roughly 30 degrees.
- Some hammockers use a small angle gauge or simply adjust by feel.
- Why 30 Degrees? The ideal angle between the strap and the ground is about 30 degrees. This angle balances comfort and safety:
Sag
- The “Smile” Shape:
- When properly hung, your hammock should have a gentle curve, resembling a smile. This is called the “banana” or “smile” sag.
- Benefits of Proper Sag:
- Comfort: A saggy hammock allows you to lie diagonally, which flattens your body position and reduces pressure points.
- Stability: A hammock with the right sag is less likely to flip and is easier to get in and out of.
- Safety: Too tight a hang increases the force on your suspension and anchor points, risking equipment failure or tree damage.
- How Much Sag?
- A good rule of thumb is that the lowest point of the hammock (when you’re inside) should be about chair height (18–20 inches/45–50 cm) off the ground.
- Adjust the straps or the distance between trees as needed to achieve this.
Additional Tips for Efficient Hammock Setup
- Test Before Committing: Sit in the hammock gently before fully committing your weight to ensure everything is secure and comfortable.
- Check for Twists: Make sure straps and suspension lines are flat and untwisted to distribute weight evenly.
- Inspect Gear: Before each use, check your straps, carabiners, and hammock fabric for wear or damage.
Proper hammock setup—using wide tree-friendly straps, attaching at the right height and angle, and ensuring a gentle sag—maximizes comfort, safety, and environmental responsibility. Taking a few extra minutes to get these details right will lead to a much better camping experience and help protect the forest for others.
2.2. Positioning
Proper positioning in your hammock is crucial for comfort, safety, and maximizing the benefits of hammock camping. Let’s explore each aspect in detail:
Lay Diagonally
- Why Lay Diagonally? Most beginners instinctively lie straight along the centerline of the hammock, which causes the fabric to wrap tightly around the body, creating a “banana” shape. This position can lead to pressure points, a curved spine, and discomfort, especially during overnight stays.
- The Ergonomic Advantage: By lying at a diagonal angle (about 20–30 degrees off the centerline), you flatten the hammock’s curve. This allows your body to rest in a more natural, horizontal position, supporting your back and reducing pressure on your shoulders and legs.
- How to Achieve the Diagonal Lay:
- After sitting in the hammock, swing your legs in and shift your hips and feet slightly to one side while moving your head and shoulders to the opposite side.
- The hammock fabric will spread out, creating a wider, flatter surface for your body.
- Benefits:
- Improved Comfort: Reduces the “shoulder squeeze” and “calf ridge” that can occur when lying straight.
- Better Sleep: A flatter position supports your spine and allows for side sleeping or shifting positions during the night.
- Enhanced Stability: The hammock feels less tippy and more stable when you’re lying diagonally.
Clear the Area
- Why Clear the Ground Beneath Your Hammock? Even though you’re suspended above the ground, accidents can happen—suspension failure, improper setup, or simply rolling out of the hammock. Ensuring the area below is free of hazards is a key safety step.
- What to Remove:
- Sharp Objects: Sticks, rocks, pinecones, and other debris that could cause injury if you fall.
- Hard or Uncomfortable Items: Large roots, logs, or uneven ground that could make moving around the campsite difficult or uncomfortable.
- How to Clear the Area:
- Use your feet or a stick to gently move debris aside. Avoid disturbing the ground more than necessary—just enough to create a safe landing zone.
- If you’re in a sensitive area, try to return debris to its original place when you break camp to minimize your impact.
- Additional Safety Tips:
- Height: Hang your hammock so the lowest point (when you’re inside) is about chair height (18–20 inches/45–50 cm) above the ground. This reduces the risk of injury if you fall.
- Check for Insects: Clearing the area also helps you spot ant nests, wasp burrows, or other insect hazards.
Other Positioning Considerations
- Orientation:
- Position your hammock so your head is slightly higher than your feet for comfort and to prevent sliding.
- Consider the direction of wind and rain—orient your hammock and tarp to provide maximum protection.
- Privacy and Views:
- Choose a spot that offers privacy from trails or other campsites, and take advantage of scenic views if possible.
Lying diagonally in your hammock is the key to a flat, comfortable sleeping position, while clearing the area beneath your hammock ensures safety in case of accidental falls. Together, these positioning strategies enhance your hammock camping experience, making it both more enjoyable and secure.
3. Shelter and Weather Protection
3.1. Tarp Setup
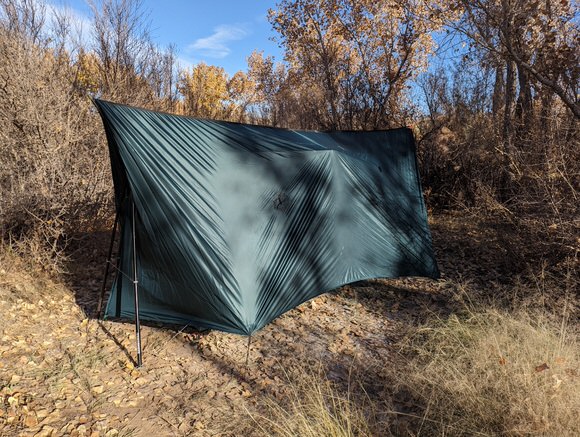
A tarp is your primary defense against rain, wind, and even sun when hammock camping. Proper tarp setup is essential for staying dry, warm, and comfortable in a dense forest. Here’s a detailed exploration of the key elements:
Ridgeline
- What is a Ridgeline? A ridgeline is a cord or rope strung tightly between two trees above your hammock, serving as the anchor point for your tarp. There are two main types:
- Continuous Ridgeline: The cord runs from one tree to the other, and the tarp is attached anywhere along its length.
- End-Only Ridgeline: The tarp is attached directly to the trees at each end, with no cord running the full length.
- Why Use a Separate Ridgeline?
- Adjustability: A separate ridgeline allows you to easily center and tension your tarp over the hammock, regardless of where your hammock is hung.
- Tautness: It helps keep the tarp tight and prevents sagging, which is crucial for effective rain runoff.
- Protection: A well-set ridgeline ensures the tarp covers the entire hammock, including the ends (where rain can sneak in).
- How to Set Up:
- Choose trees that are slightly farther apart than your hammock setup.
- Attach the ridgeline at a height that allows the tarp to hang low enough for protection but high enough for you to sit or stand under.
- Use knots like the bowline, taut-line hitch, or hardware like carabiners and tensioners for quick setup and adjustment.
- Tarp Attachment:
- Attach the tarp to the ridgeline using prusik knots, carabiners, or tarp clips. This allows you to slide and center the tarp as needed.
Stake Out
- Guylines and Stakes:
- Guylines: These are cords attached to the corners and sides of your tarp. They are staked out to the ground to create tension and shape.
- Stakes: Use lightweight, durable stakes (aluminum, titanium, or even sturdy sticks) to anchor the guylines.
- Adjusting for Wind and Weather:
- Wind Direction:
- Orient the tarp so the broadest side faces into the prevailing wind, providing a windbreak.
- In stormy conditions, pitch the tarp lower and closer to the hammock for maximum protection.
- Rain:
- Ensure the tarp extends well beyond the ends of your hammock to prevent rain from blowing in.
- Angle the tarp so water runs off away from your hammock and gear.
- Versatility:
- In fair weather, you can pitch the tarp higher or in “porch mode” (using trekking poles or sticks to lift one side) for better airflow and views.
- In heavy rain or wind, pitch it low and tight for a bunker-like setup.
- Wind Direction:
- Tensioning:
- Use tensioners, taut-line hitches, or hardware like LineLocs to keep guylines tight as the weather changes or as the tarp fabric stretches.
- Regularly check and adjust guylines, especially after rain or wind.
Additional Tarp Setup Tips
- Drip Lines: Tie small pieces of cord on the suspension lines under the tarp to divert water and prevent it from running down into your hammock.
- Coverage: Choose a tarp size and shape (rectangular, hex, or winter/doors) that matches your expected conditions. Larger tarps offer more protection but are heavier and bulkier.
- Practice: Practice setting up your tarp at home or in good weather so you can do it quickly and efficiently when conditions are challenging.
A well-set tarp, hung on a separate ridgeline and properly staked out, is vital for weather protection in hammock camping. By understanding ridgeline setup, guyline tensioning, and how to adjust for wind and rain, you ensure a dry, comfortable, and secure shelter—no matter what the forest throws your way.
3.2. Insulation
Staying warm in a hammock requires a different approach than ground camping. Because air circulates freely beneath you, heat loss through convection can quickly lead to discomfort or even hypothermia, even in mild weather. Proper insulation is essential for a safe and restful night. Let’s explore the two main components:
Underquilt or Sleeping Pad
Why You Need Bottom Insulation: When you lie in a hammock, your body compresses the insulation of a sleeping bag or quilt beneath you, drastically reducing its effectiveness. The air moving under the hammock draws heat away from your body, making you feel cold from below—a phenomenon known as “cold butt syndrome.”
Underquilt:
- What It Is: An underquilt is a specially designed, insulated blanket that hangs beneath your hammock, creating a pocket of warm air between you and the cold air outside.
- How It Works:
- The underquilt is suspended with shock cords or clips, allowing it to “hug” the bottom of the hammock without being compressed.
- It covers from your shoulders to your feet (full-length) or just your core (three-quarter length), depending on the model.
- Advantages:
- Superior warmth and comfort compared to pads.
- No shifting or sliding during the night.
- Packs down small and is lightweight (especially down-filled models).
- Considerations:
- More expensive than pads.
- Requires some practice to set up and adjust for a snug fit.
Sleeping Pad:
- What It Is: A foam or inflatable pad placed inside the hammock, under your sleeping bag or quilt.
- How It Works:
- The pad provides a barrier between your body and the cold air, reducing heat loss.
- Closed-cell foam pads are lightweight and inexpensive; inflatable pads offer more comfort and packability.
- Advantages:
- Multipurpose (can be used for ground camping).
- Less expensive and widely available.
- Considerations:
- Can shift or bunch up during the night.
- May cause “cold shoulders” if not wide enough for hammock use.
- Some find pads less comfortable due to stiffness or condensation.
Pro Tip: If using a pad, consider a pad sleeve or double-layer hammock to help keep it in place.
Top Quilt or Sleeping Bag
Why You Need Top Insulation: While bottom insulation prevents heat loss from below, you still need something to trap warmth above you. This is where a top quilt or sleeping bag comes in.
Top Quilt:
- What It Is: A top quilt is like a sleeping bag without a back or hood, designed specifically for hammock camping.
- How It Works:
- You drape it over yourself, tucking the sides around your body for warmth.
- The footbox keeps your feet warm, while the open back allows for easy entry and exit.
- Advantages:
- Lighter and less bulky than sleeping bags.
- No compressed insulation under your back (where it’s ineffective anyway).
- Easy to vent or adjust for temperature changes.
- Considerations:
- May take some getting used to if you’re accustomed to sleeping bags.
Sleeping Bag:
- What It Is: A traditional mummy or rectangular sleeping bag.
- How It Works:
- You climb inside and zip it up as you would on the ground.
- Advantages:
- Familiar and versatile.
- Can be used for both hammock and ground camping.
- Considerations:
- Insulation under your body is compressed and less effective.
- Can be awkward to get in and out of in a hammock.
- May feel restrictive.
Pro Tip: In warm weather, a lightweight blanket or liner may be sufficient. In cold weather, combine a top quilt with a warm hat and socks for maximum comfort.
Additional Insulation Tips
- Layering: Add or remove layers as needed for changing temperatures. A fleece or down jacket can supplement your insulation.
- Draft Protection: Make sure your underquilt or pad fits snugly to prevent cold air from sneaking in at the sides or ends.
- Head and Feet: Wear a warm hat and socks, as these areas are prone to heat loss.
- Condensation: Ensure good airflow under your tarp to reduce condensation, which can dampen insulation and decrease warmth.
Effective insulation in a hammock setup relies on a combination of bottom insulation (underquilt or sleeping pad) and top insulation (top quilt or sleeping bag). Understanding how each works and how to use them together will keep you warm, comfortable, and safe in any forest conditions.
4. Camp Organization
4.1. Gear Storage
Efficient gear storage is essential for a comfortable, organized, and safe hammock camping experience—especially in a dense forest where ground conditions can be damp, uneven, or crawling with insects. Proper organization also helps you keep track of your belongings and protects them from the elements and wildlife. Let’s explore the main strategies:
Gear Sling
What is a Gear Sling? A gear sling is a small hammock or mesh net suspended beneath your main hammock, designed to hold your backpack, shoes, and other bulky items off the ground.
Benefits:
- Protection from Moisture: Forest floors are often damp, muddy, or prone to sudden rain. Keeping your gear elevated prevents it from soaking up moisture, which can lead to discomfort and damage.
- Insect and Critter Defense: Elevating your gear helps keep it away from ants, spiders, rodents, and other curious creatures that might chew or nest in your belongings.
- Convenience: Your gear is easily accessible from your hammock, especially at night or in bad weather.
How to Use:
- Hang the gear sling from your hammock suspension or from a separate line between the same trees.
- Place your backpack, shoes, and other items inside. Some slings have mesh bottoms for drainage and ventilation.
- Make sure the sling is high enough to avoid contact with the ground but low enough for easy access.
Alternative: Groundsheet If you don’t have a gear sling, use a waterproof groundsheet (such as a piece of Tyvek, a small tarp, or a trash bag) under your hammock.
- Place your gear on the groundsheet to keep it dry and clean.
- Fold or roll the groundsheet over your gear in case of rain.
Ridgeline Organizer
What is a Ridgeline Organizer? A ridgeline organizer is a small pouch or series of pockets that hangs from the hammock’s internal ridgeline (the cord running above you inside the hammock).
Benefits:
- Easy Access: Keeps essential items—like a headlamp, phone, glasses, book, or water bottle—within arm’s reach, even while lying down.
- Organization: Prevents small items from getting lost in your sleeping bag or falling out of the hammock at night.
- Safety: In an emergency, you can quickly grab your light, whistle, or first aid kit.
How to Use:
- Attach the organizer to the ridgeline using clips, Velcro, or integrated loops.
- Sort your items by priority: keep the most important or frequently used items in the most accessible pockets.
- Some organizers have zippered or mesh pockets for added security and visibility.
Additional Gear Storage Tips
- Hang Food and Scented Items: In bear country or areas with wildlife, always hang food and scented items (toothpaste, deodorant) away from your sleeping area, at least 200 feet away and 10–15 feet off the ground.
- Drying Line: String a separate line for drying wet clothes or gear, away from your hammock to avoid drips.
- Stuff Sacks and Compression Bags: Use color-coded or labeled stuff sacks to keep gear organized and easy to find in low light.
- Shoes: Store shoes in a mesh bag or hang them from your suspension to keep them dry and critter-free.
Thoughtful gear storage—using a gear sling or groundsheet for bulky items and a ridgeline organizer for essentials—keeps your campsite tidy, your gear protected, and your most important items always within reach. This organization not only enhances comfort and efficiency but also contributes to safety and peace of mind in the forest.
4.2. Cooking and Fire Safety
Cooking and fire management are critical aspects of camp organization, especially in a dense forest where wildlife encounters, fire hazards, and environmental impact are real concerns. Proper practices ensure your safety, protect the forest, and help maintain a low-impact campsite. Here’s a detailed exploration:
Cook Away from Hammock
Why Distance Matters:
- Wildlife Attraction: Cooking smells, food scraps, and even packaging can attract animals—ranging from rodents to bears. By keeping your cooking area at least 100 feet (about 30 meters) from your hammock, you reduce the risk of animals associating your sleeping area with food.
- Safety: If an animal does visit your cooking area, you’re less likely to be disturbed or endangered while sleeping.
- Odor Control: Scattering your scent and food odors helps minimize the overall impact on wildlife behavior.
How to Set Up a Cooking Area:
- Location: Choose a flat, open spot downwind and downhill from your sleeping area, if possible. This helps keep smoke and odors away from your hammock.
- Organization:
- Use a small camp table, flat rock, or ground cloth to keep your cooking gear organized and clean.
- Store all food, trash, and scented items in bear-proof containers or hang them from a tree, well away from both your hammock and cooking area.
- Cleanliness:
- Wipe down all cooking surfaces and utensils after use.
- Pack out all food scraps and trash—never bury or burn them.
Pro Tip: If you’re camping with a group, designate a shared cooking area and keep all food-related activities confined to that spot.
Fire Safety
If Fires Are Allowed:
- Use Established Fire Rings:
- Only build fires in existing fire rings or fire pans to minimize impact on the forest floor and prevent the spread of fire scars.
- Never create new fire rings or clear vegetation for a fire.
- Keep Fires Small and Manageable:
- A small fire is easier to control, requires less wood, and produces less smoke.
- Gather only dead and downed wood from the ground—never cut live trees or branches.
- Keep your fire no larger than necessary for cooking or warmth.
- Supervision:
- Never leave a fire unattended, even for a short time.
- Always have water and a shovel or dirt nearby to extinguish the fire quickly if needed.
- Extinguishing:
- When finished, drown the fire with water, stir the ashes, and feel for heat. Repeat until the ashes are cold to the touch.
- Scatter cool ashes away from the campsite if appropriate.
Alternatives to Campfires:
- Stoves:
- Use a backpacking stove for cooking. Stoves are safer, more efficient, and leave no trace.
- In many areas, stoves are required during dry seasons or fire bans.
Fire Bans and Regulations:
- Always check local regulations before lighting any fire. Many forests have seasonal fire bans due to drought or high fire risk.
- Respect all posted signs and guidelines.
Additional Cooking and Fire Safety Tips
- Wind Direction: Set up your cooking area so smoke and food odors blow away from your hammock and other tents.
- Lighting: Use a headlamp or lantern for safe cooking after dark, but avoid attracting insects to your sleeping area.
- Food Storage: After cooking, immediately store all food and trash in bear-proof containers or hang them using the “bear hang” method, at least 10–15 feet off the ground and 4 feet from the tree trunk.
Cooking and fire safety in a hammock campsite require thoughtful separation of food activities from your sleeping area and strict adherence to fire safety protocols. By cooking at least 100 feet from your hammock and using established fire rings or stoves, you protect yourself, the forest, and its wildlife—ensuring a safe and enjoyable camping experience for all.
5. Breaking Camp
5.1. Leave No Trace
Breaking camp responsibly is just as important as setting up. The goal is to leave the forest exactly as you found it—or better—so that future visitors and wildlife can enjoy an unspoiled environment. This is the essence of the Leave No Trace (LNT) ethic. Let’s explore the key practices in detail:
Pack Out Everything
Remove All Trash and Gear:
- “Pack it in, pack it out” is the golden rule. Every item you brought—food wrappers, scraps, hygiene products, gear, and even biodegradable items like fruit peels—must leave with you.
- Double-Check Your Site:
- Before leaving, walk through your entire campsite, including your hammock area, cooking spot, and any paths you used.
- Look under leaves, rocks, and logs where items may have rolled or blown.
- Gear Inventory:
- Make a checklist of your gear and double-check it before leaving to ensure nothing is forgotten.
- Pay special attention to small items like tent stakes, guylines, and stuff sacks, which are easy to overlook.
Why It Matters:
- Trash left behind can harm wildlife, pollute water sources, and spoil the wilderness experience for others.
- Even “natural” items like orange peels or nutshells can take years to decompose and are not native to the forest ecosystem.
Check for Microtrash
What is Microtrash?
- Microtrash refers to tiny bits of litter—such as food crumbs, twist ties, plastic corners, bits of foil, cigarette butts, and even small pieces of paper or string.
- These items are easily overlooked but can have a significant impact on the environment and wildlife.
How to Check for Microtrash:
- Grid Search:
- Slowly walk back and forth across your campsite, scanning the ground closely.
- Get down to ground level for a better view, especially in leaf litter or underbrush.
- Use a Headlamp:
- At dusk or dawn, shine a headlamp or flashlight at a low angle across the ground. The light will reflect off shiny or light-colored trash, making it easier to spot.
- Common Microtrash Hotspots:
- Around your hammock and gear storage area.
- Cooking and eating spots.
- Under trees where you may have hung food or gear.
- Paths between your hammock and other camp areas.
Why It Matters:
- Microtrash can be ingested by wildlife, causing injury or death.
- It accumulates over time, degrading the wilderness experience for everyone.
Additional Leave No Trace Practices When Breaking Camp
- Naturalize the Site:
- Gently scatter any moved sticks, leaves, or rocks to restore the area’s natural appearance.
- Brush out footprints or flattened grass if possible.
- Check Trees:
- Inspect the trees you used for your hammock. Make sure your straps didn’t damage the bark, and avoid using the same trees repeatedly if you return.
- Campfire Remnants:
- If you used a fire ring, make sure the ashes are cold and scatter them if appropriate. Remove any leftover charcoal or unburned wood.
- Human Waste:
- If you used a cathole for waste, ensure it is properly filled and disguised. Pack out used toilet paper and hygiene products in a sealed bag.
Breaking camp with Leave No Trace principles means packing out every item you brought, meticulously searching for microtrash, and restoring the site to its natural state. These actions protect wildlife, preserve the beauty of the forest, and ensure that the wilderness remains pristine for future generations.
5.2. Tree and Site Care
Caring for the trees and campsite you use is a vital part of responsible hammock camping. Trees are living organisms that can be harmed by improper practices, and the forest floor is a delicate ecosystem that recovers slowly from disturbance. Thoughtful tree and site care ensures the health of the forest and preserves its wild character for others. Here’s how to do it right:
Inspect Trees
Why Inspect Trees?
- Trees are the foundation of your hammock setup. Even with tree-friendly straps, repeated or improper use can cause bark abrasion, girdling, or other damage that weakens or kills the tree.
- Healthy trees support not just your hammock, but also countless species of birds, insects, and other wildlife.
How to Inspect:
- After Takedown:
- Once you remove your hammock and straps, closely examine the bark where the straps were placed.
- Look for signs of abrasion, indentations, or broken bark. Healthy bark should look the same as before you arrived.
- If You Notice Damage:
- If you see any damage, make a note not to use that tree again in the future.
- Consider reporting significant damage to land managers if you’re in a managed forest or park.
- Avoid Repeated Use:
- Even with wide straps, using the same trees repeatedly can cause cumulative damage. If you return to the same area, rotate your hammock setup to different trees each time.
- Encourage others to do the same, especially in popular dispersed camping areas.
Pro Tip: Always use straps that are at least 1 inch (2.5 cm) wide and avoid ropes or cords, which can cut into bark and cause long-term harm.
Restore the Area
Why Restore the Area?
- The goal is to leave the site looking as natural and undisturbed as possible, so future visitors see no evidence of your stay.
- Restoration helps the forest floor recover and discourages the creation of unofficial campsites, which can lead to habitat loss and erosion.
How to Restore:
- Scatter Leaves and Debris:
- If you cleared sticks, leaves, or rocks to set up your hammock or gear, gently scatter them back over the area before you leave.
- This camouflages any flattened grass, compacted soil, or bare spots, helping the site blend back into the forest.
- Fluff Up Vegetation:
- If you trampled ferns, moss, or other plants, gently fluff them up with your hands or a stick to help them recover.
- Erase Signs of Use:
- Brush out footprints, especially in muddy or soft areas.
- If you used a groundsheet or gear sling, check for compressed soil and gently aerate it with a stick if needed.
- Campfire Remnants:
- If you used a fire ring, scatter cold ashes and naturalize the area if fires are permitted and it’s appropriate to do so.
Why It Matters:
- Restoration not only protects the ecosystem but also preserves the sense of wildness and solitude that makes dispersed camping special.
- It sets a positive example for others and helps maintain access to wild places by demonstrating responsible use.
Additional Site Care Tips
- Minimize Future Impact:
- Share photos and stories of your Leave No Trace practices to encourage others.
- If you notice heavily impacted sites, consider camping elsewhere to give the area time to recover.
- Educate Others:
- If you’re camping with friends or family, teach them about tree and site care as part of the camping experience.
Tree and site care are essential for sustainable hammock camping. By inspecting trees for damage, rotating your setup, and restoring the area before you leave, you help protect the forest’s health and beauty—ensuring it remains a haven for wildlife and future campers alike.
Conclusion (In-Depth)
Setting up a hammock campsite efficiently in a dense forest is both an art and a science, blending practical skills with a deep respect for the natural world. Let’s explore why each element—site selection, gear, and Leave No Trace principles—is essential, and how their integration leads to a superior camping experience.
Thoughtful Site Selection
Choosing the right spot is the foundation of a successful hammock camp. In a dense forest, this means:
- Prioritizing Safety: Selecting healthy, sturdy trees and avoiding hazards like dead branches, animal trails, or flood-prone areas ensures your well-being throughout your stay.
- Minimizing Impact: By camping on durable surfaces and away from sensitive areas like water sources, you help preserve the forest’s delicate ecosystems.
- Enhancing Comfort: A well-chosen site offers natural shelter from wind and rain, privacy, and a peaceful atmosphere, all of which contribute to a restorative outdoor experience.
Proper Gear and Setup
The right equipment and setup techniques are crucial for comfort, warmth, and protection from the elements:
- Tree-Friendly Suspension: Using wide straps protects trees and ensures your hammock is secure.
- Weather Protection: A well-pitched tarp shields you from rain and wind, while proper insulation (underquilt or pad, top quilt or sleeping bag) keeps you warm through the night.
- Organization: Efficient gear storage—using gear slings, ridgeline organizers, and thoughtful camp layout—keeps your belongings dry, accessible, and safe from wildlife.
Adherence to Leave No Trace Principles
Leave No Trace is more than a set of rules—it’s a mindset that guides every action in the outdoors:
- Preserving Wilderness: By packing out all trash, checking for microtrash, and restoring your campsite, you ensure the forest remains pristine for wildlife and future visitors.
- Respecting Wildlife: Cooking and storing food away from your sleeping area reduces animal encounters and helps maintain natural animal behaviors.
- Caring for Trees and Land: Inspecting trees for damage and rotating your setup prevents long-term harm to the forest’s living infrastructure.
The Result: A Comfortable, Safe, and Responsible Experience
When you combine these elements, you create a campsite that is:
- Comfortable: You sleep well, stay dry, and have everything you need within reach.
- Safe: You minimize risks from falling branches, wildlife, and weather.
- Environmentally Responsible: Your presence leaves no lasting mark, allowing the forest to thrive and remain wild.
The Bigger Picture
Practicing efficient and responsible hammock camping in dense forests not only enhances your own experience but also contributes to the stewardship of wild places. Each camper who follows these principles helps ensure that forests remain healthy, beautiful, and accessible for generations to come.
By approaching hammock camping with intention, preparation, and respect, you become part of a community of outdoor enthusiasts who value both adventure and conservation—a legacy that benefits everyone who seeks solace and inspiration among the trees.


Leave a Reply